
Jim’s WPCB plugin was a WordPress plugin designed for embedding the customer booking form in WordPress websites.
The plugin is now deprecated as the widget based embed is the recommended way to embed the customer booking form in websites.

1: Introduction
The WPCB (CB3) plugin is a tool designed for WordPress websites, enabling seamless integration of customer booking form (CB3). With this plugin, you can effortlessly incorporate CB3 forms (integrated with FMS) into your website and enhance the booking experience for your customers.
1.1 Features
- New design: We have revamped the design of the CB3 form to make it more user-friendly and modern. You will love the new look and feel of the form.
- GA4 integration and tracking: You can now connect your CB3 plugin to your Google Analytics 4 account and track the performance of your campaigns, conversions, and events. You can also use GA4 to segment your audience and optimize your marketing strategies.
- Shortcode generator: You can also use the shortcode generator to embed your form anywhere on your website with a simple code snippet.
- Custom layout and popup option: You can now customize the layout of your CB Forms using the plugin options.
You can also choose to display your forms as popups if you are using the new Jims Theme. - Service Ordering: Customize the order in which your services are displayed, allowing you to prioritize and showcase your most important offerings.
- Categorization of Services: Organize your services into categories to provide a structured and user-friendly booking experience for your customers.
- Category and Service Descriptions: Add descriptions to both service categories and individual services, providing customers with essential information about what each category/service entails. These descriptions help customers better identify what the want.
- Leads tracking and error logs: You can now track the leads generated by your campaigns and export them to your CRM or email marketing platform. You can also view the error logs of your campaigns and troubleshoot any issues.
- Seamless compatibility: The plugin is specifically designed to seamlessly work with WordPress, ensuring smooth integration and optimal performance.
- Customization options: Customize the appearance and functionality of your CB forms to match your website’s branding and requirements.
- Integration with FMS: The plugin seamlessly integrates with FMS.
2: Installation
You can watch this quick setup video or scroll down for more in depth information.
* Video includes only general setup options.
2.1 System Requirements
- WordPress Version: 6.0 or higher.
- PHP Version: 8.0 or higher.
- Database: MySQL 5.5 or higher, or MariaDB 10.0 or higher.
- Web Server: Apache
- Browser Compatibility: Modern browsers such as Chrome, Firefox, Safari, and Edge.
- JavaScript: Enabled in the user’s browser.
2.2 Downloading the Plugin
To get the Jim’s WPCB plugin, click the button below to download the plugin in ZIP format.
2.3 Installing the Plugin via WordPress Dashboard
Installing the Jim’s WPCB plugin through the WordPress dashboard is a straightforward process. Follow these steps to get the plugin up and running:
- Log into Your WordPress Dashboard: Log in to your WordPress admin panel using your administrator credentials.
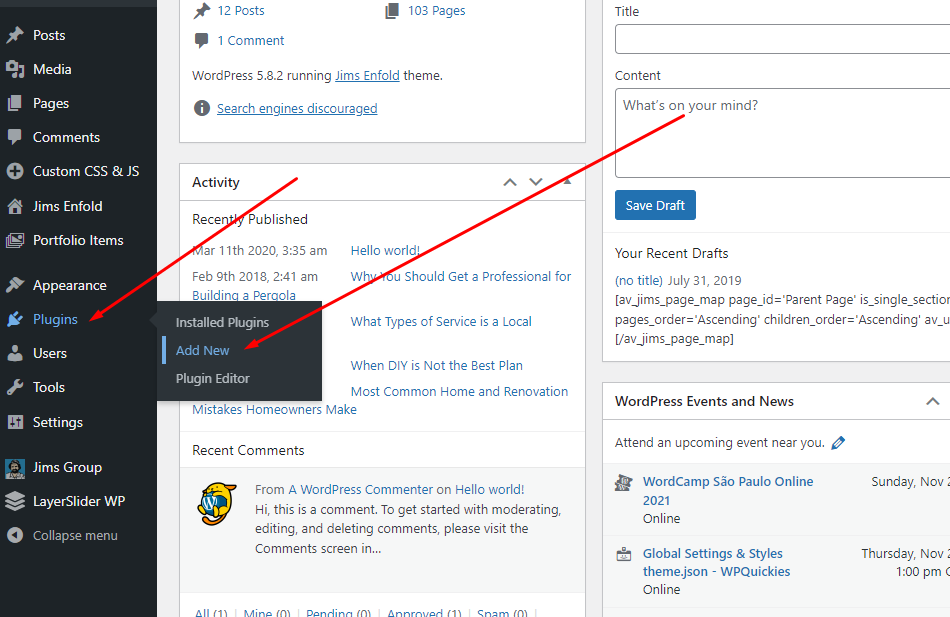
- Navigate to the Plugins Page: From the left-hand menu, hover over “Plugins” and click on “Add New”. This will take you to the plugin installation page.
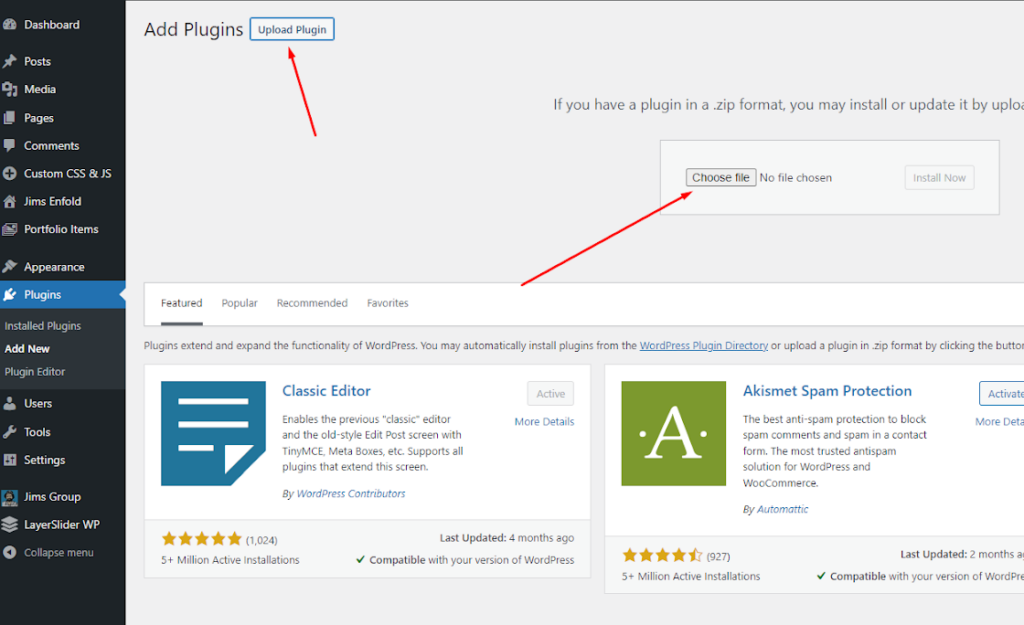
- Upload the Plugin: On the top of the “Add Plugins” page, you’ll find an “Upload Plugin” button. Click this button.
- Choose the ZIP File: Click the “Choose File” button and select the ZIP file you downloaded earlier for the Jim’s WPCB plugin.
- Install the Plugin: After selecting the ZIP file, click the “Install Now” button. WordPress will upload and install the plugin from the ZIP file.
- Activate the Plugin: Once the installation is complete, you’ll see an “Activate” button. Click this button to activate the Jim’s WPCB plugin.
Your Jim’s WPCB plugin is now installed and active on your WordPress website. You can proceed to configure its settings.
Important Note
Exclude all plugin scripts and styles from caching. You can use caching on other areas of your site, just not on anything to do with CB
- Exclude all plugin scripts and styles from caching.
- Exclude all URL endpoints that start with:
/wp-json/jims-wpcb/wp-content/plugins/jims-wpcb/wp-content/plugins/jims-wpcb-early/wp-content/plugins
- Whitelist the following IPs:
139.99.218.52139.99.155.18913.210.62.90
If you experience any issues after installing the plugin, such as:
- WPCB dashboard don’t work, you can’t
- Division and Country listing not loading
- The form displaying incorrectly
Please contact Infotech to whitelist your server IP and inspect your setup.
3: CB 3 Settings | Initial Setup
To access the settings for the Jim’s WPCB plugin:
- The WPCB dashboard not loading
- Division and country lists not appearing
- Click on “Settings.” This will take you to the plugin’s settings page:
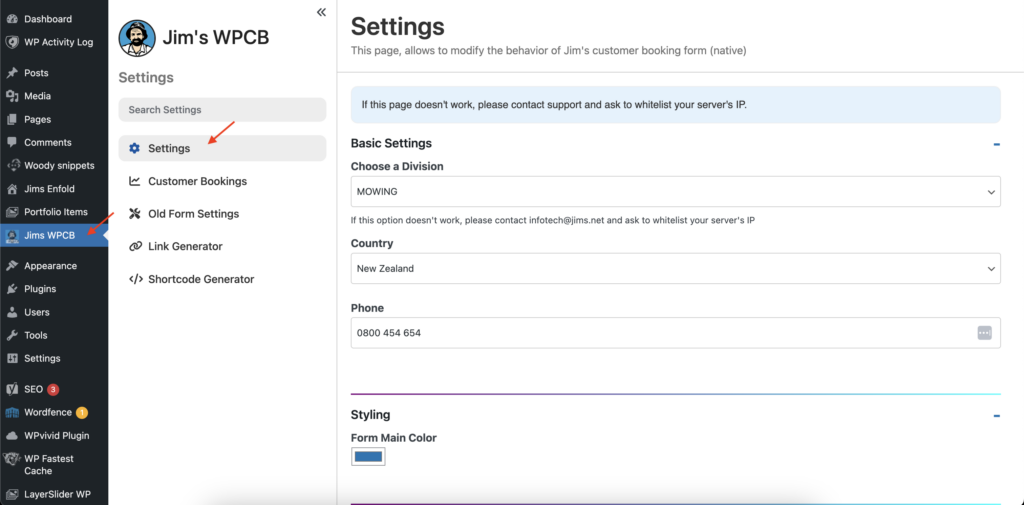
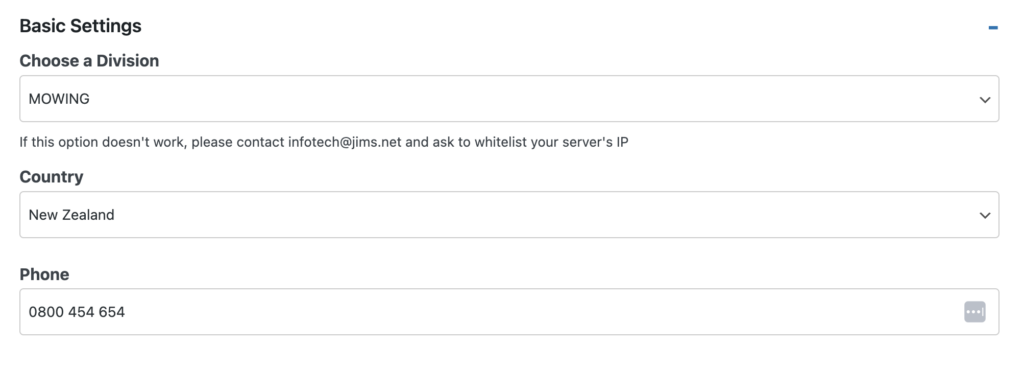
Basic Settings
- Choose a Division: Select your division. If you can’t find it in the list, please contact Infotech.
- Country: Select the country in which the division operates (available options: Australia, New Zealand, United Kingdom, Canada)
- Phone: Enter the default phone number to be displayed on the booking form. For example: 131 546 for Australia.
Styling
- Form Main Color: Customize the main colour of the booking form to match your website’s branding.

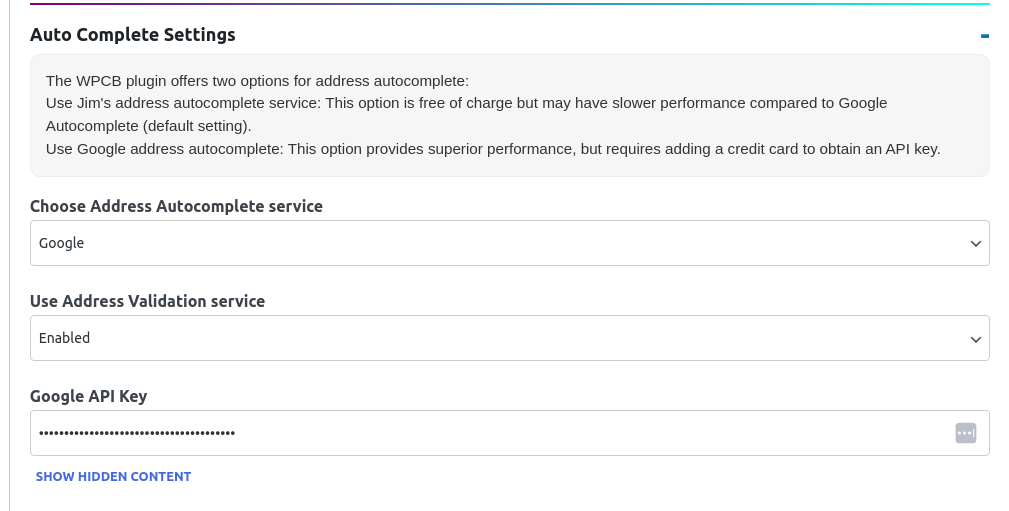
Location Auto Complete Settings
The WPCB plugin offers two options for address autocomplete:
- Use Jim’s Address Autocomplete Service (default): This option is free of charge but may have slightly slower performance compared to Google Autocomplete.
- Use Google Address Autocomplete: This option provides superior performance but requires you to create your own Google Maps API key through google, and there’s an associated cost from Google’s API usage.
Feel free to try out Jim’s Address Autocomplete Service and make a decision.
We strongly recommend using Google’s Autocomplete service for an enhanced user experience.
Additionally, please enable the Address Validation option to improve compatibility with FMS when using Google’s Address Autocomplete.
If you do not have your own Google API key, please contact Infotech, and we will provide one for you.
You can watch the following video to setup Google for Autocomplete and Address validation:
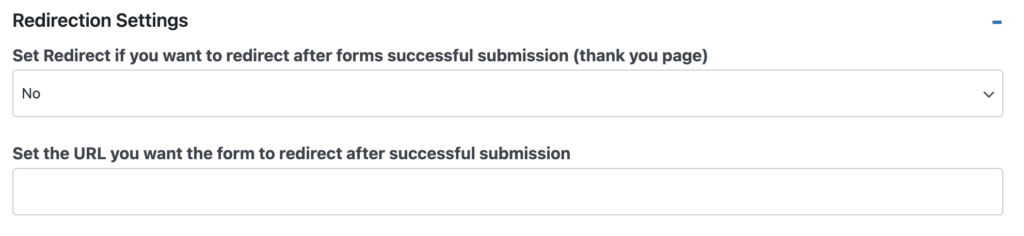
Redirection Settings
Choose whether to set a redirect after the form’s successful submission (thank you page):
- No: No redirection after submission. Thank you page, alongside with information about the selected Franchisee will be displayed directly on the form.
- Yes: Specify the URL where you want the form to redirect after a successful submission.
Auto-Update Settings
The WPCB plugin offers two options for auto-updating:
- Stable: This option installs the latest stable version of the plugin.
- Early: This option installs the latest version of the plugin, including features that are still in development.
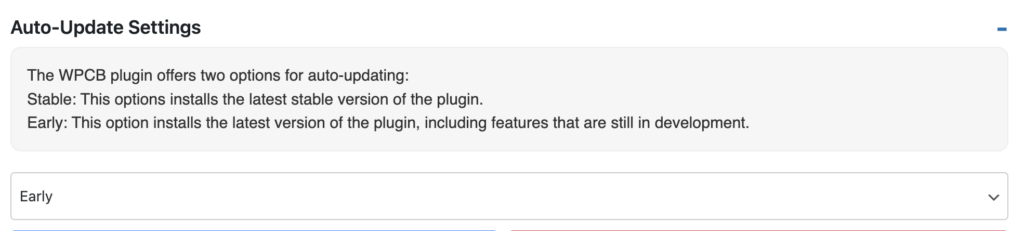
Once you have entered the desired settings, click on the “Save Values” button to save your changes.
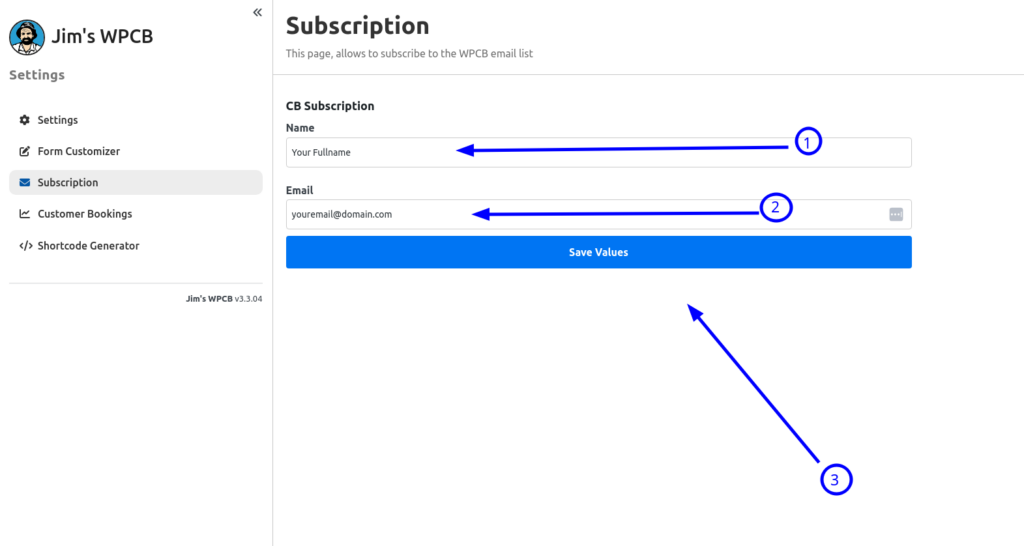
Subscribe to Admin Notifications (Mandatory)
Go to WPCB’s Dashboard and click on ‘Subscription.’ Enter your full name and email in the appropriate fields, then click ‘Save Values.’ Please use an email that you check frequently.
The CB form will not function until you subscribe.
Clear Caches
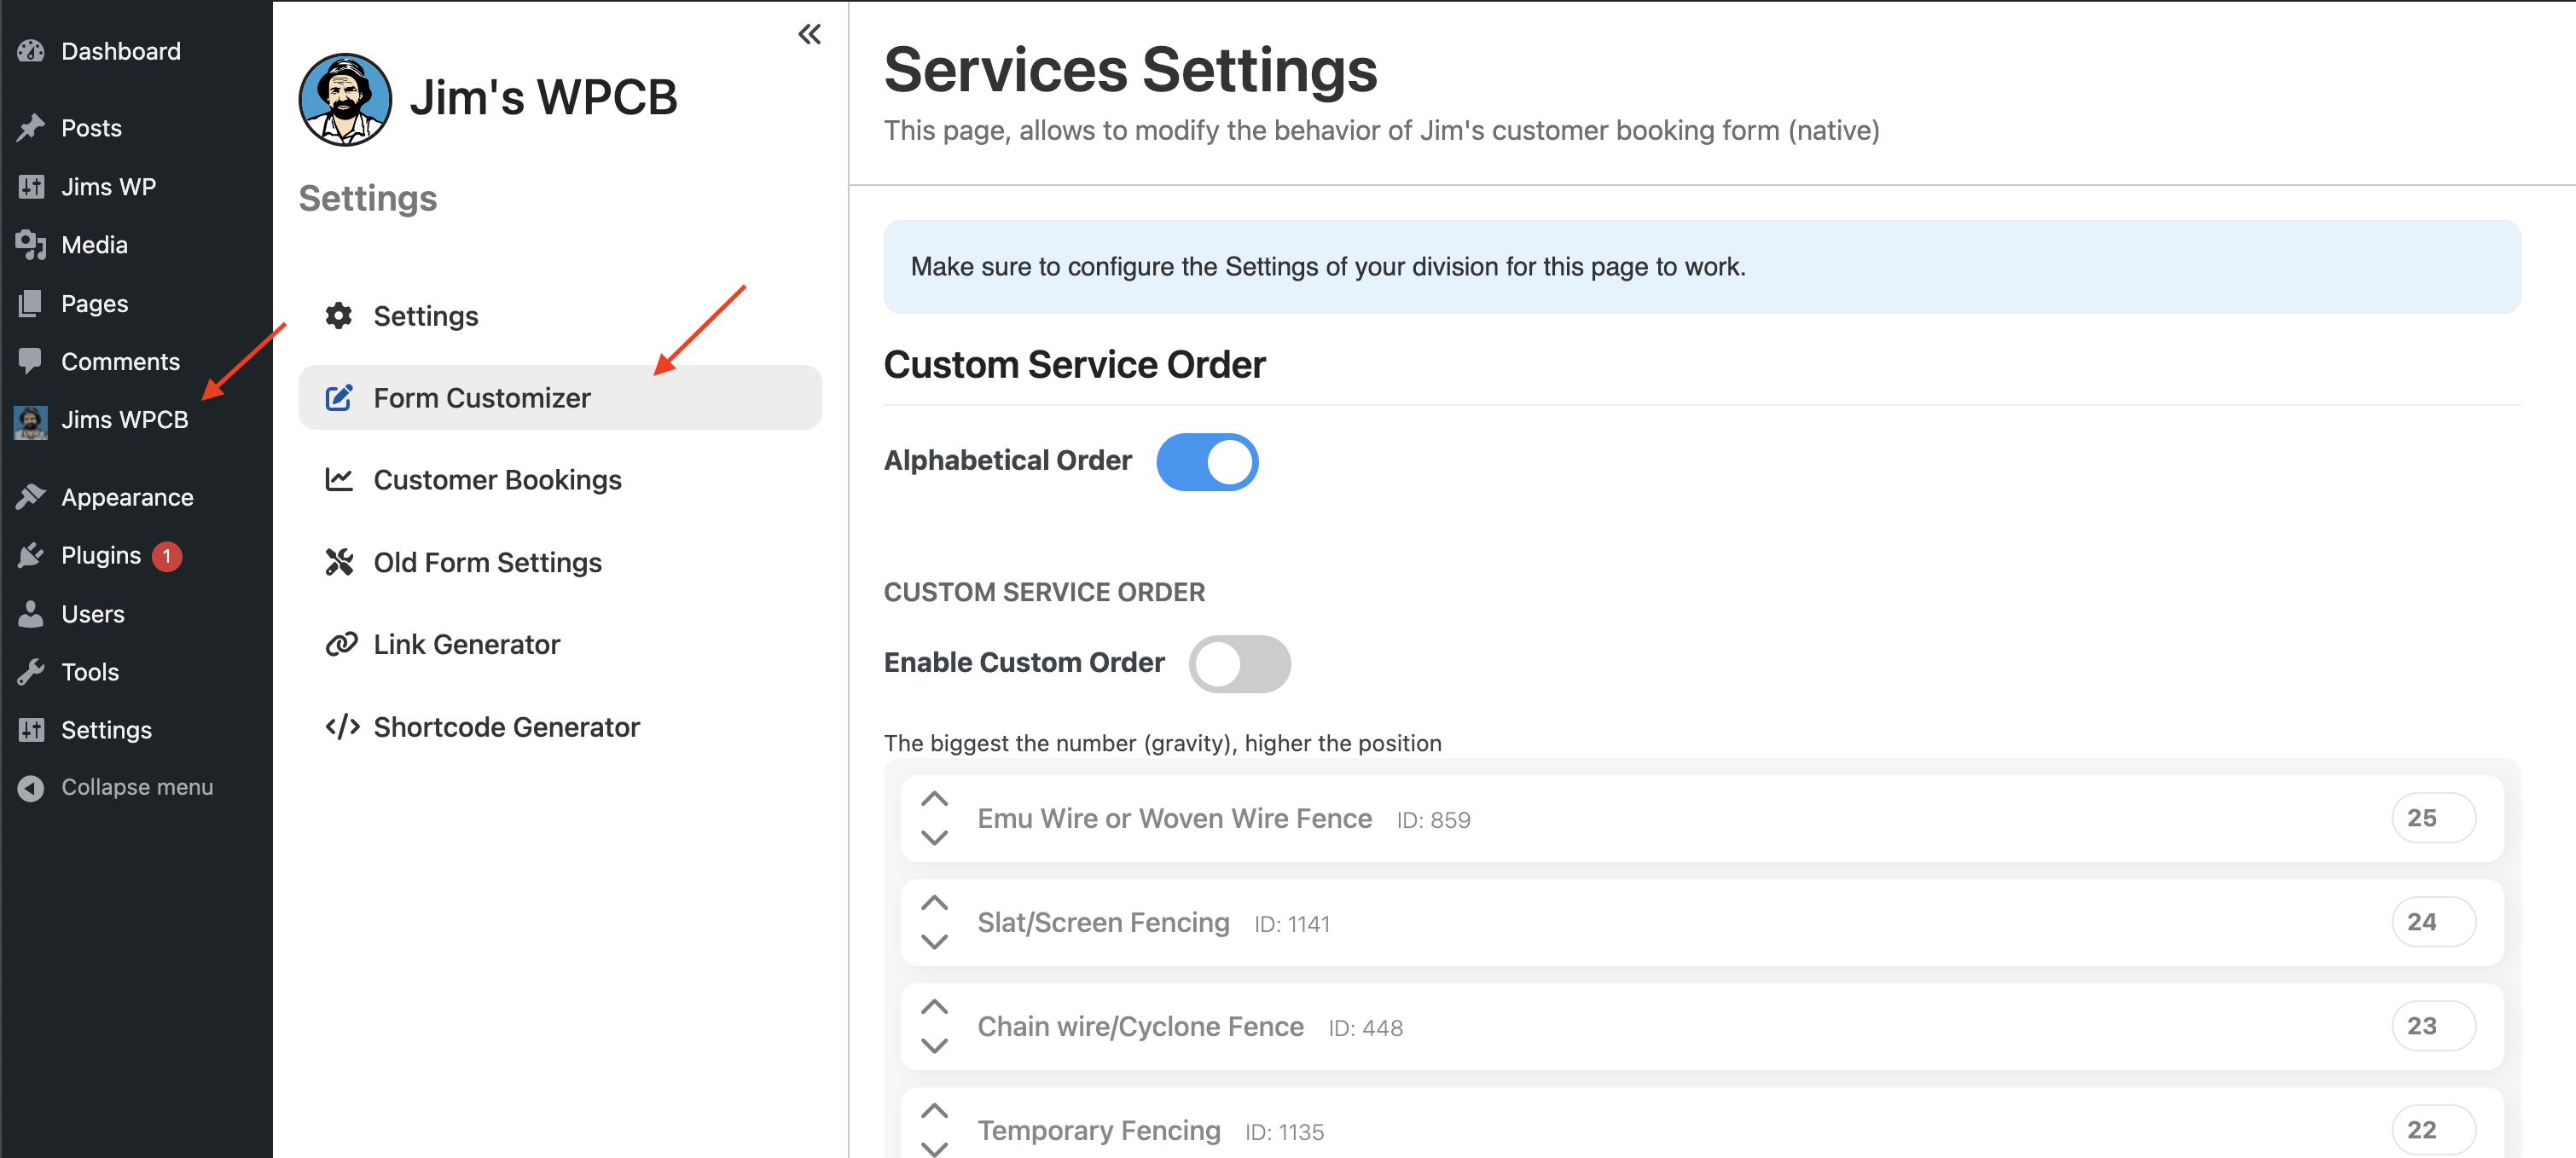
4: Form Customization: Service Ordering, Categories & Descriptions
To access the form customization settigns for the Jim’s WPCB plugin:
- Log in to your WordPress admin dashboard.
- From the left-hand menu, navigate to “Jim’s WPCB”.
- Click on “Form Customizer” This will take you to the plugin’s form customization page:
Make sure to configure the Settings of your division first for this page to work.
4.1 Custom Service Order
In the Jim’s WPCB (CB3) Plugin, you have the flexibility to customize the order in which your services are displayed to your customers. By default, the services are listed in alphabetical order, making it easy for customers to find services based on their names. However, we understand that you may want to prioritize certain services or arrange them in a specific order that aligns with your business strategy.
To achieve a custom service order, follow these steps:
- Enable Custom Service Order Toggle:
- Begin by enabling the “Custom Service Order” toggle. This will allow you to take control of the service order and disable the default alphabetical ordering.
- Once the toggle is enabled, you’ll notice that the service list below it is now available for editing.
- Customize Service Order Using the UI:
- Up/Down Arrows: You can click on the up and down arrows next to each service name. Clicking the “Up” arrow will move the service upwards in the list, and clicking the “Down” arrow will move it downwards. This allows for a simple reordering
- Custom Numbers: Alternatively, you can assign custom numbers to services based on their popularity or importance. The services with higher assigned numbers will be displayed at the top of the list. For instance, if you set a service’s number to 1, it will be shown last, followed by services with higher numbers.
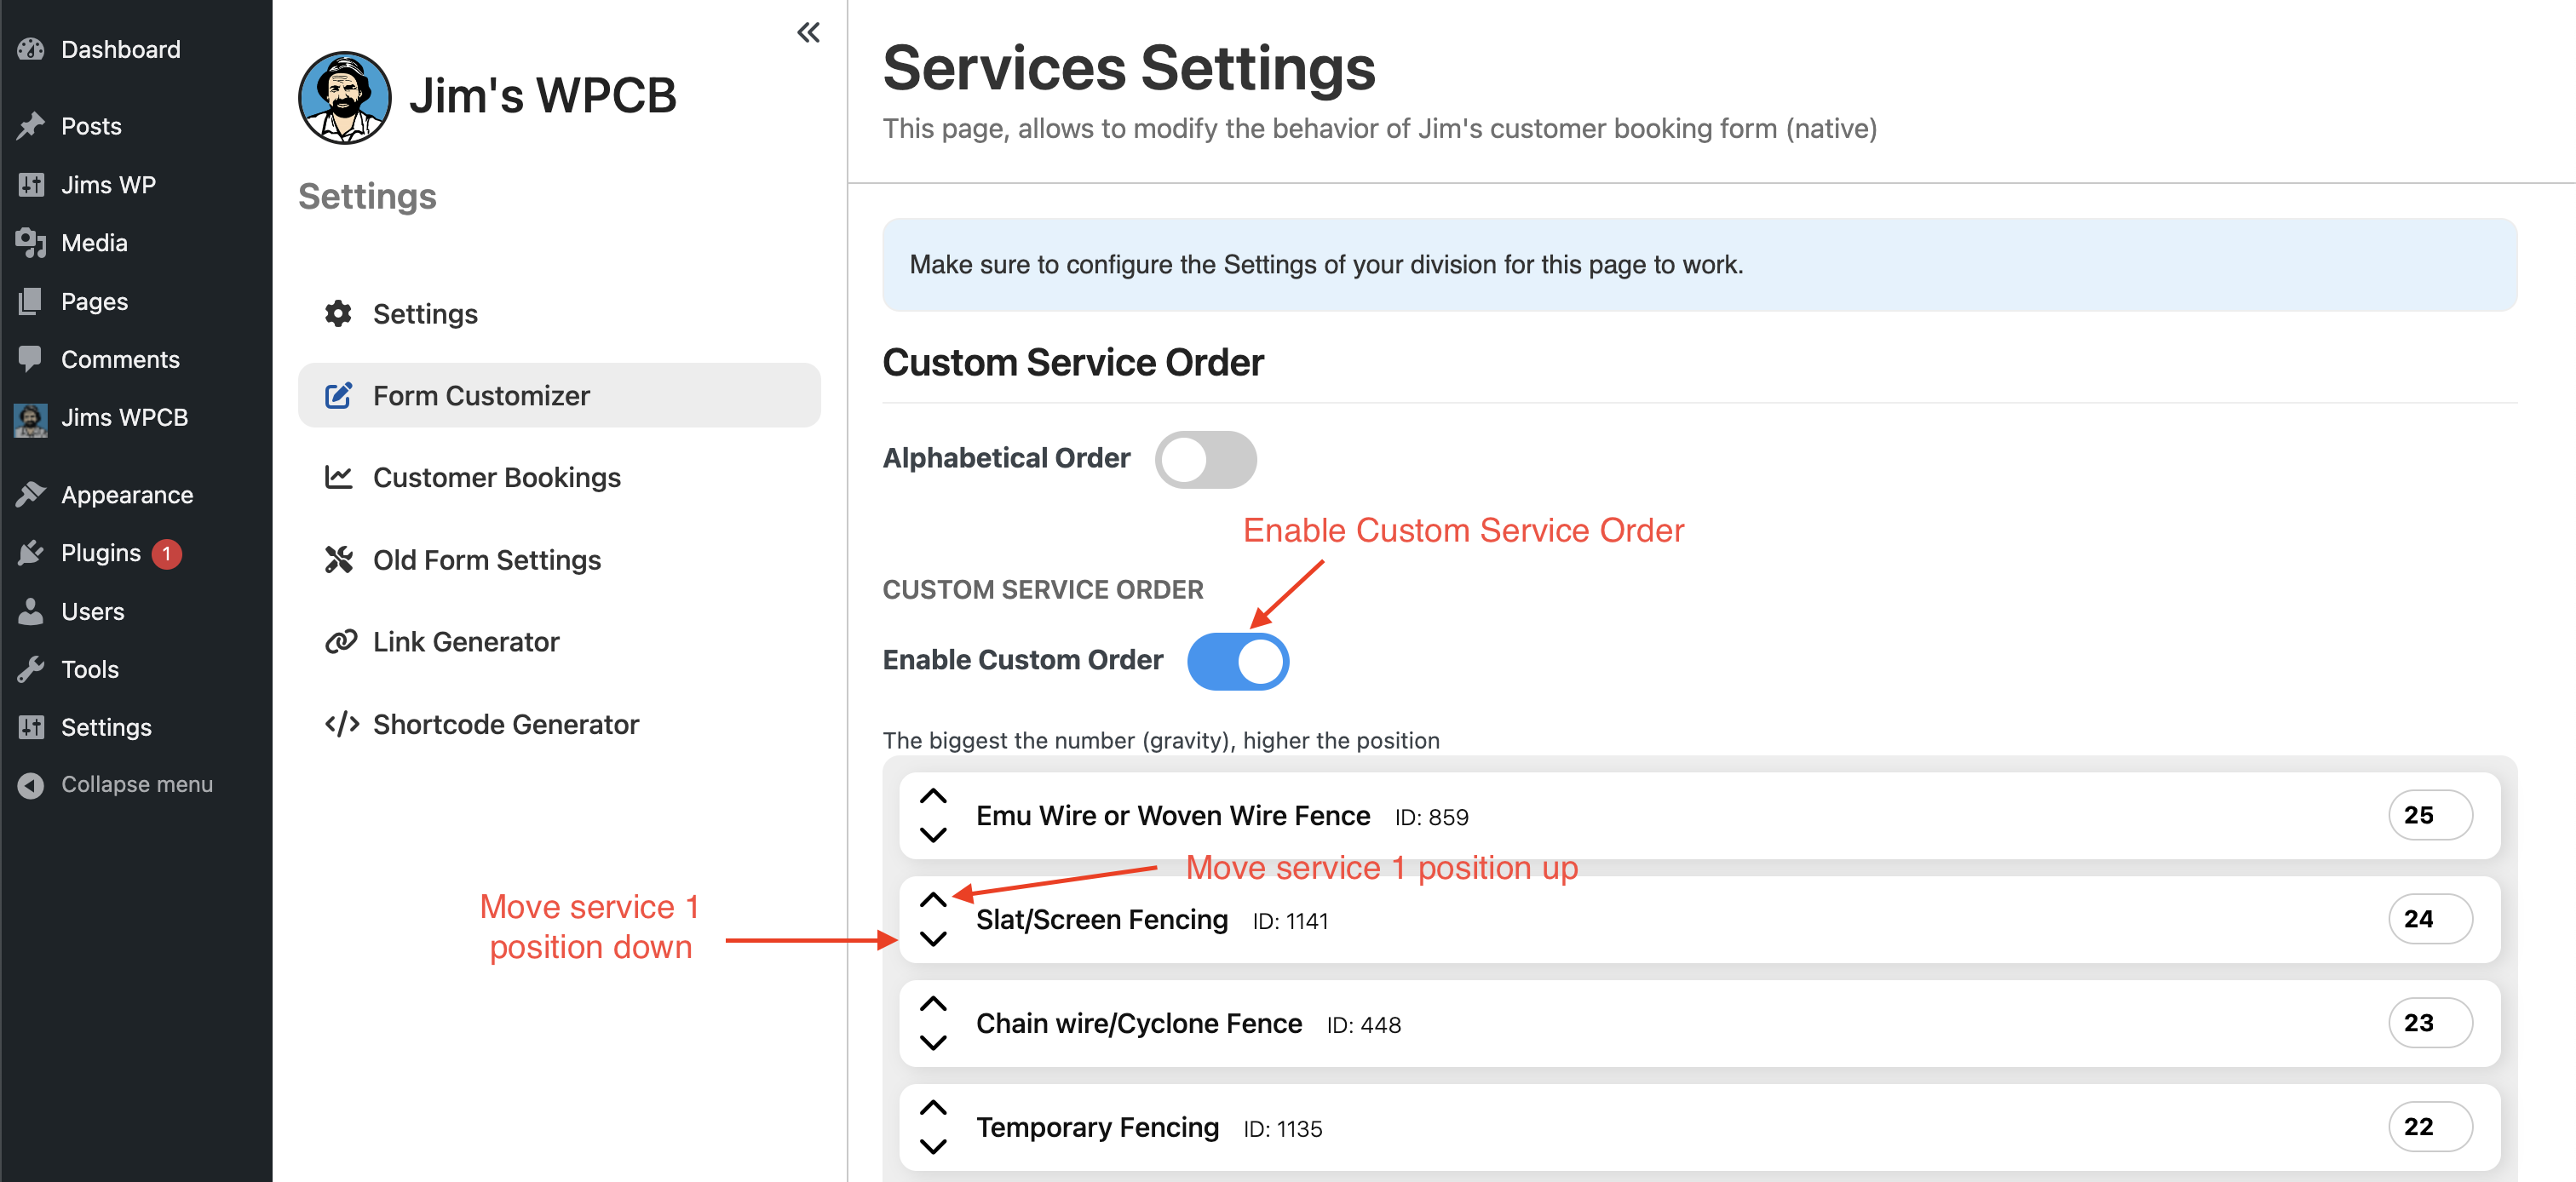
Feel free to adjust the order of services according to your needs. This level of customization ensures that your customers can easily access the services that matter most to them.
4.2 Service Categories
By default, services are displayed without any categorization, making it easy for customers to browse through them. However, if you want to enhance the organization and presentation of your services by grouping them into categories, the Jim’s WPCB (CB3) Plugin offers a user-friendly and intuitive way to do so.
How to Create Service Categories:
- Toggle “Enable Category Grouping”:
- To enable service categories, simply click on the “Enable Category Grouping” toggle located under the “Categories” section. This action activates the category feature.
- Once enabled, you’ll notice that the user interface (UI) below it becomes editable, allowing you to create and manage service categories.
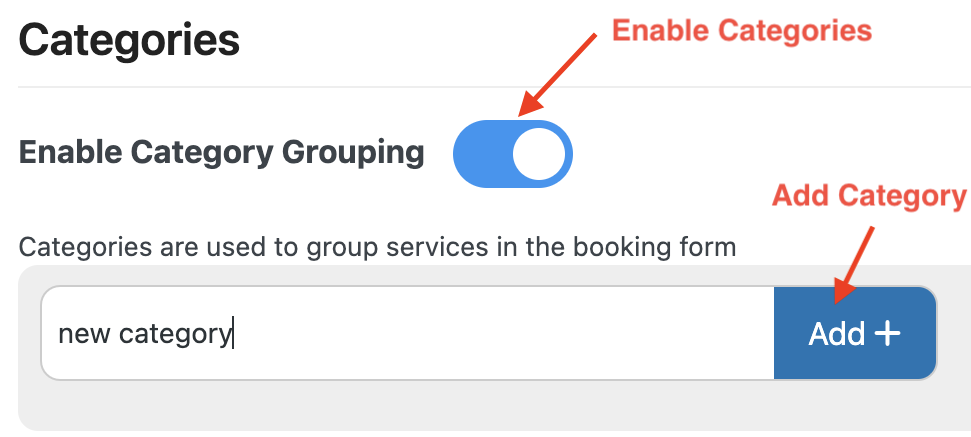
- Add a New Category:
- In the enabled UI, you’ll find an input field where you can enter the name of the category you want to create. The name should be a minimum of 4 characters.
- After entering the category name, click the “Add +” button next to the input field to create the category.
- View and Add Services to Categories:
- View: Once a category is created, it will appear below as a toggle. By clicking on the name of the category, you can open the toggle to view and manage its contents.
- Description: Within the category toggle, you have the option to add a description to provide additional information about the category.
- Add Service: Below the description field, you can add services to the category. To do this, type the name of the service you want to add in the input field. A list of available services will be shown, and you can select the desired service from the list. After selection, click the “Add +” button to add it to the category.
- Remove Service Or Category:
- To delete a category, simply click the trash icon next to the service name.
- To remove a service from a category, simply click the “x” icon next to the service name.
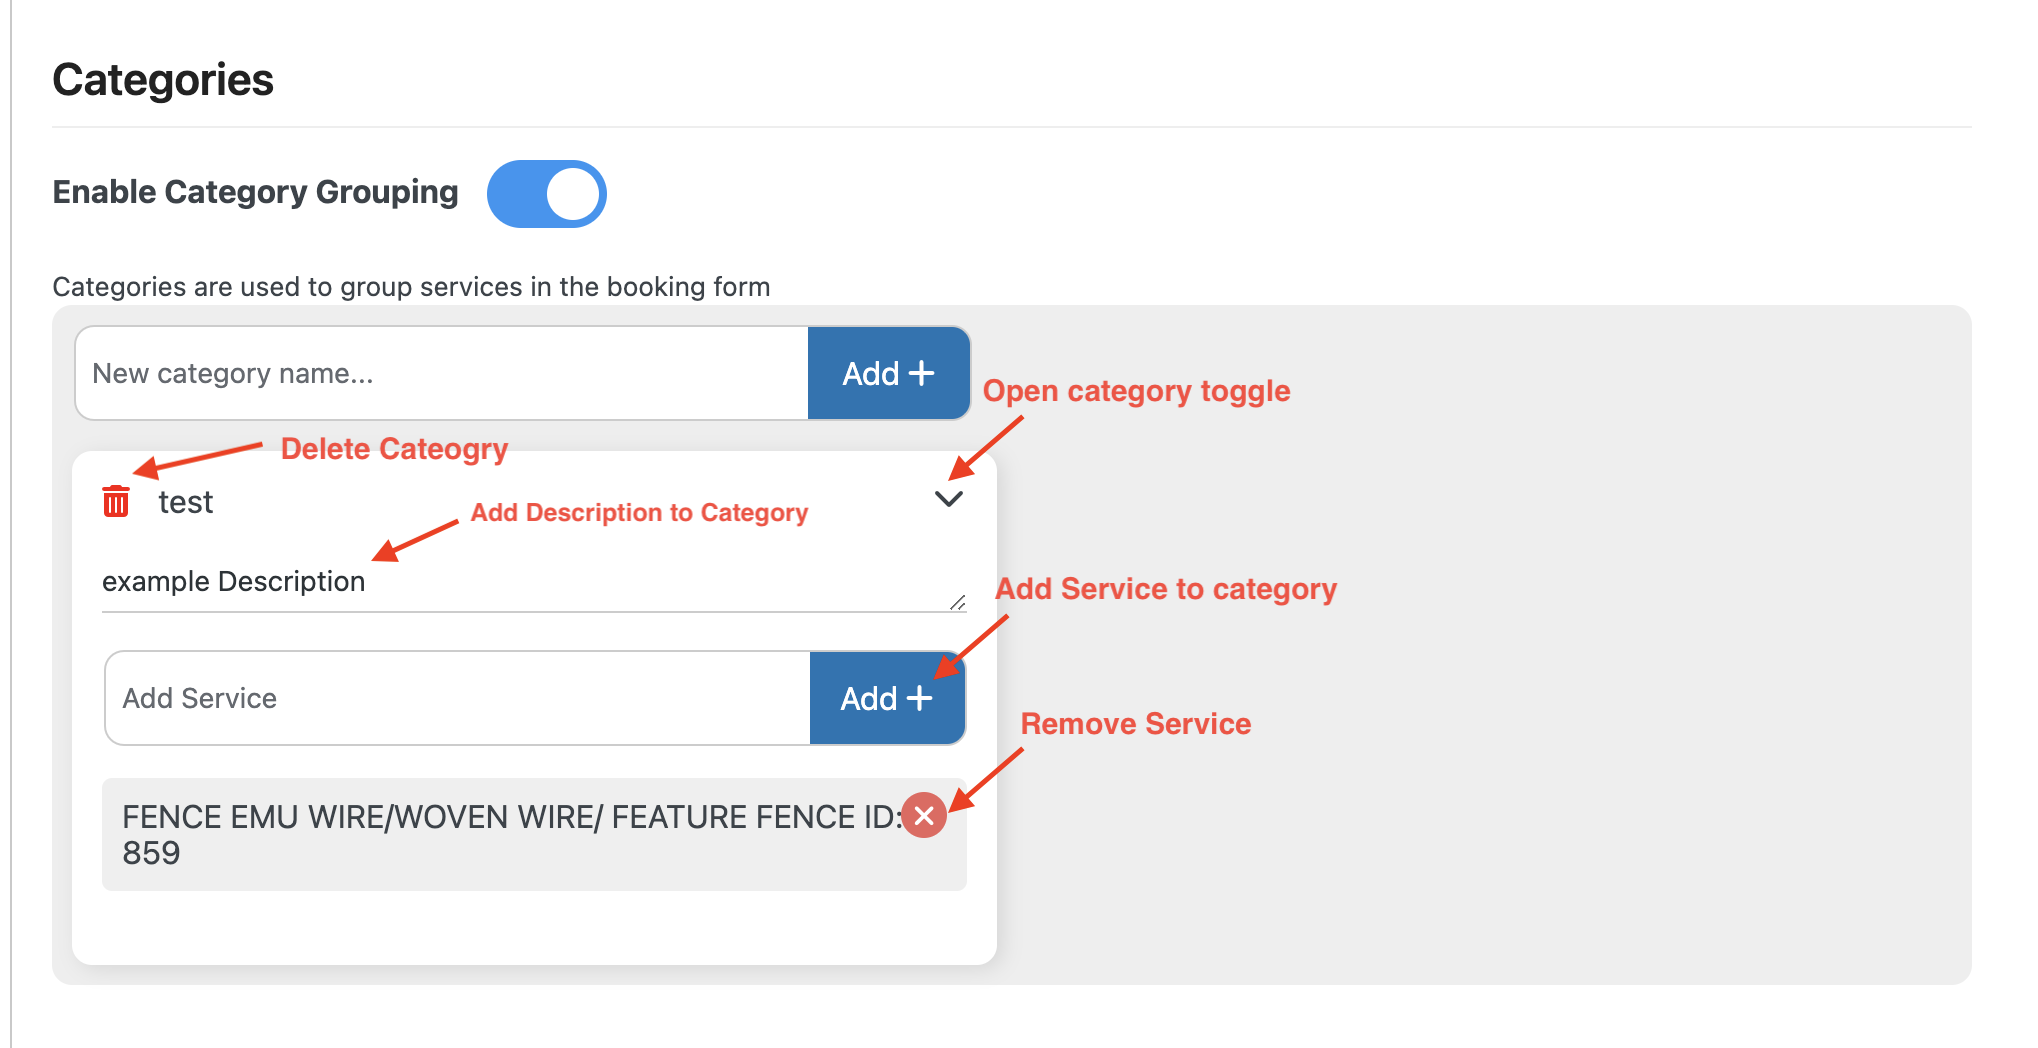
By utilizing the “Service Categories” feature, you can provide a structured and organized experience for your customers. Grouping services into categories makes it easier for customers to navigate your offerings and find the services they need. Whether you want to categorize services by type, location, or any other criteria relevant to your business, this feature allows you to tailor your booking system to suit your customers’ preferences and improve their overall experience.
Video tutorial on creating service groups
4.3 Service Descriptions
Under the “Service Descriptions” section, you have the ability to provide short descriptions for each service offered by your division. These descriptions help customers understand what each service entails and make informed decisions when booking.
How to Add Service Descriptions:
- Toggle “Enable Service Descriptions”:
- To enable service descriptions, locate the “Enable Service Descriptions” toggle. Clicking this toggle activates the service description feature, allowing you to add or edit descriptions for your services.
- Once enabled, the user interface (UI) below it becomes editable, allowing you to customize service descriptions.
- Service Descriptions for Each Service:
- In the enabled UI, you’ll find a list of all the services offered by your division.
- Under each service name, you’ll see an input field where you can enter a short description for that service.
- If you don’t want a service to have a description, simply leave the input field empty
- Disabling Service Descriptions:
- If you ever wish to remove or disable service descriptions, you can do so by disabling the “Enable Service Descriptions” toggle. This will revert the UI to its default state, where service descriptions are not editable or displayed.
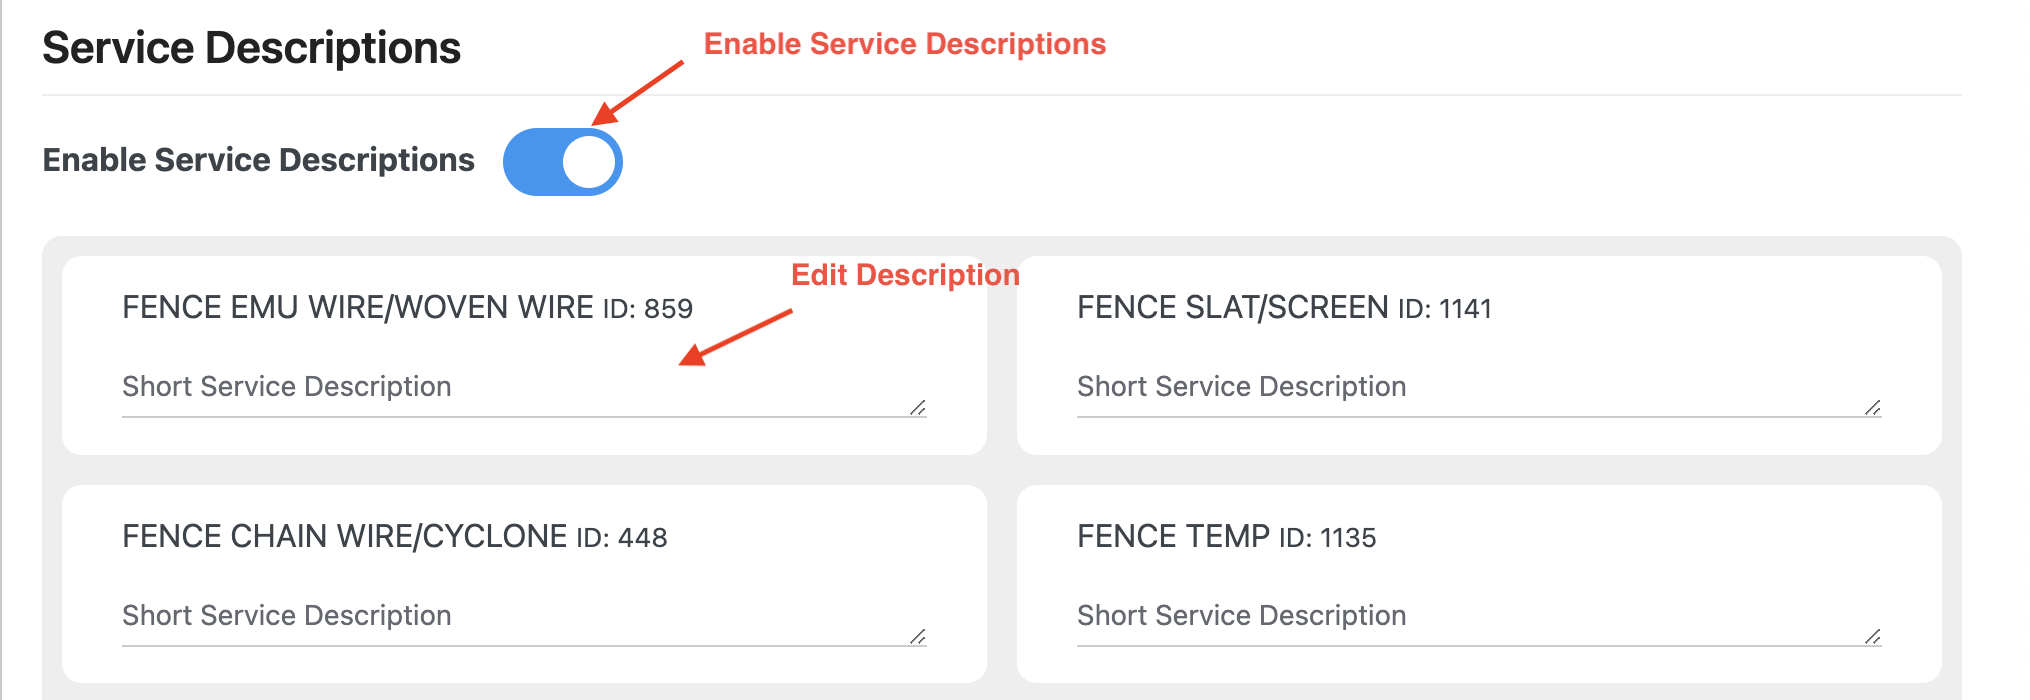
By utilizing the “Service Descriptions” feature, you can enhance the clarity and information provided to your customers. These short descriptions offer valuable insights into each service, helping customers make well-informed choices. Whether you want to highlight unique features, benefits, or any other relevant details, this feature allows you to tailor service descriptions to meet your customers’ needs.
5: Shortcode Usage & Popup
5.1 Understanding Shortcodes
Shortcodes are special tags that allow you to embed dynamic content, such as forms, directly into your posts, pages, or custom post types. They enable you to display complex features without needing to write extensive code. With the Jim’s WPCB plugin, you can use shortcodes to effortlessly insert booking forms into your website’s content.
5.2 Generating Shortcodes
Generating shortcodes for the Jim’s WPCB plugin is a straightforward process. Go to the “Shortcode Generator” page in the plugin’s dashboard.
You have the following options for the CB3 Shortcode:
- Popup (Toggle): Enable this option if you want the form to appear as a popup. (more info below)
- Hide Logo (Toggle): Decide whether you want to hide the logo on the form.
- Contained (Disable if Popup is enabled) (Toggle): Enable this option if you are using the form outside of a popup. Disable it if the form is inside a popup.
- Hide Country (Toggle): Choose whether to hide the country field on the form.
- Hide Info Text (Toggle): Decide whether to hide informational text on the form.
- Available Services – Pre-select Specific Services (Skips Step 1): You can preselect specific services from the list below. When selected, these services will be pre-selected and user will automatically skip the first step of the form and go straight to the client information step. To disable this feature, simply de-select all services.
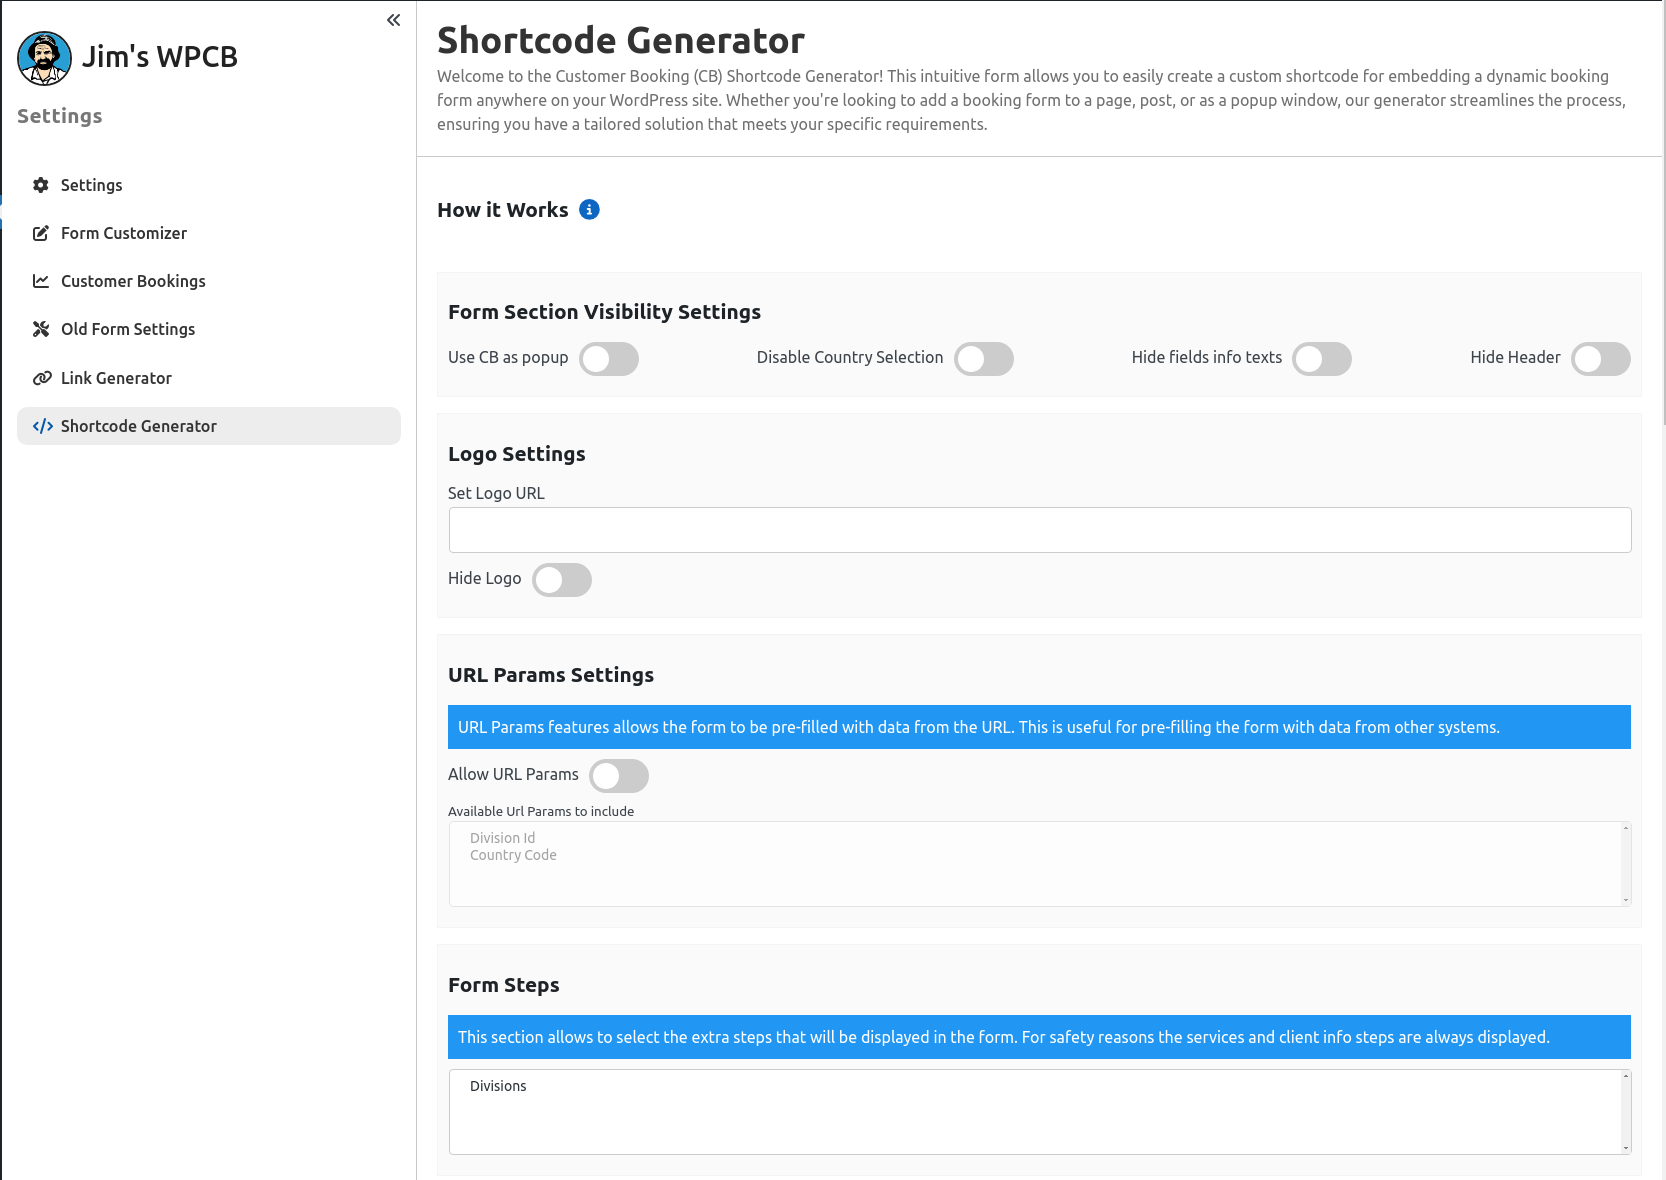
Once you have configured these options to your preference, a shortcode will be generated below with all of your selected options included. You can copy this shortcode and paste it into your page or post to display the CB3 form according to your desired settings.

Introduction video on how to use the shortcode generator:
5.3 Popup Option
The “Popup” option in the Jim’s WPCB (CB3) Plugin allows you to display the CB3 booking form as a popup on your website. This feature is particularly useful when you want to provide users with quick access to the booking form without navigating away from the current page.
Adding the Popup Option to Your Site:
- Add shortcode to header or footer: When you enable the “Popup” option, it’s important to add the CB3 form shortcode in the header or footer of your website. This ensures that the form is available and accessible throughout your entire site.
Triggering the Popup in the Front-End:
- To trigger the popup in the front-end, you don’t need to create custom scripts or complex coding. It’s as simple as linking any button or link on your website to ‘#jims‘.
- When a user clicks the button or link linked to ‘#jims’, the CB3 form popup will automatically open. This user-friendly approach enhances the user experience by providing an intuitive way to access the booking form without needing to navigate to a separate page.
Example Popup Shortcode:
[jims_wpcb_booking_form enable_popup=1]The combination of enabling the “Popup” option and linking buttons or links to ‘#jims’ offers a seamless and convenient way for your website visitors to access and use the CB3 booking form. It’s a powerful tool for improving the booking experience on your site while keeping users engaged on the same page.
5.4 Implementing the Shortcode on Pages
To implement a shortcode and display a booking form on a page:
- Log in to your WordPress admin dashboard.
- Create a new page or edit an existing one.
- In the page editor, place a shortcode widget (if you are using Jim’s theme or Elementor) and Insert the relevant shortcode, which you’ve generated using the Shortcode Generator.
- Save the page
5.5 Shortcode Parameters and Customization (Popup shown above)
The Jim’s WPCB plugin allows you to customize shortcode parameters to tailor the appearance and functionality of the embedded forms.
Current Available Options:
- Popup (Toggle): Enable this option if you want the form to appear as a popup. (more info below)
- Hide Logo (Toggle): Decide whether you want to hide the logo on the form.
- Contained (Disable if Popup is enabled) (Toggle): Enable this option if you are using the form outside of a popup. Disable it if the form is inside a popup.
- Hide Country (Toggle): Choose whether to hide the country field on the form.
- Hide Info Text (Toggle): Decide whether to hide informational text on the form.
- Available Services – Pre-select Specific Services (Skips Step 1): You can preselect specific services from the list below. When selected, these services will be pre-selected and user will automatically skip the first step of the form and go straight to the client information step. To disable this feature, simply de-select all services.
- Enable Popup: Enable this option if you want the form to appear as a popup.
enable_popup=1- Hide Logo: add the following in the shortcode if you wish to hide the logo from the form
hide_logo=1- Contained (Disable if Popup is enabled): Enable this option if you are using the form outside of a popup, shows a more sleek design for inline use.
contained=1- Hide Country: Choose whether to hide the country field on the form.
show_country=0- Hide Info Text: Decide whether to hide informational text on the form.
show_info_text=0- Available Services – Pre-select Specific Services (Skips Step 1): You can preselect specific services from the list below. When selected, these services will be pre-selected and user will automatically skip the first step of the form and go straight to the client information step. To disable this feature, simply de-select all services.
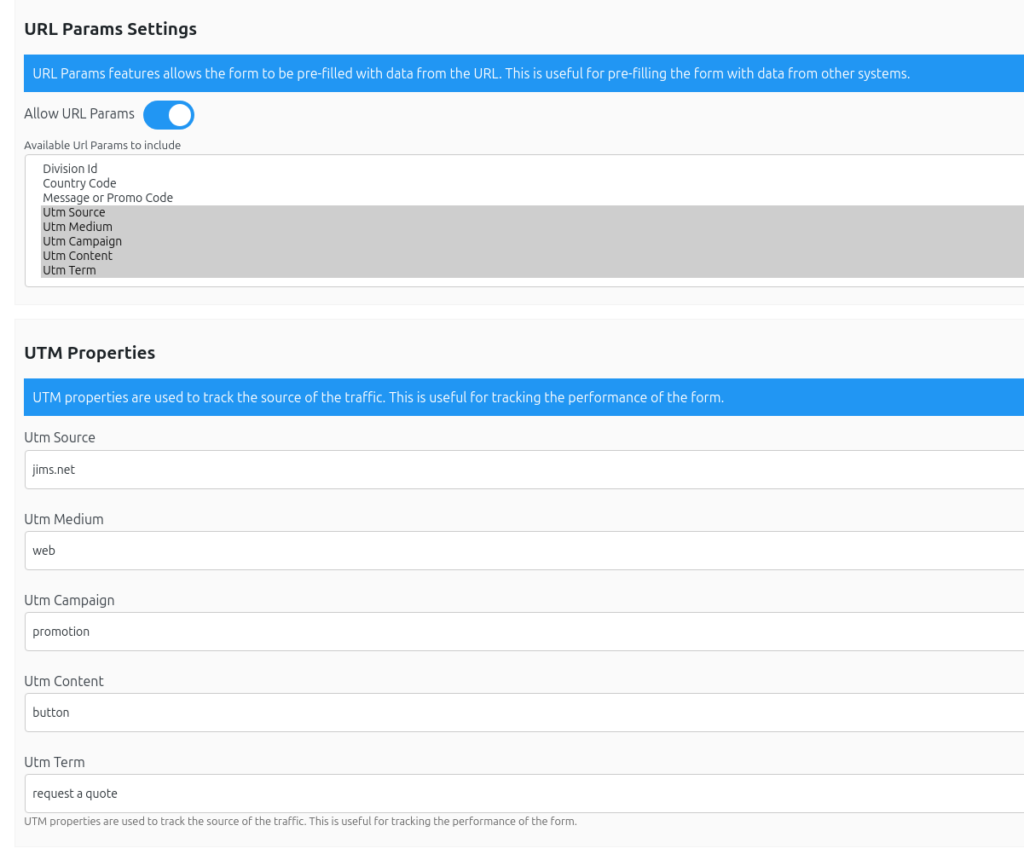
service_ids="921,693"- UTM Properties tracking.You can prepopulate UTM properties using the WPCB shortcode. These properties are useful for tracking leads through FMS, as they get recorded into the FMS lead source string. You can populate them with any alphanumeric value. ⚠️ Please note: Special characters such as `!@#$%^&*()_+={}[]/|<>?;’”:~“ are not allowed and will be rejected.
utm_source="jims.net" utm_medium="web" utm_campaign="promotion" utm_content="button" utm_term="request a quote"Please note that UTM properties are not updated for previous leads.
If the client is an existing Jim’s client, the source string in FMS doesn’t get updated, and the original lead source remains unchanged.
Full Example No Popup:
[jims_wpcb_booking_form hide_logo=1 contained=1 show_country=0 show_info_text=0 service_ids="921,693" utm_source="jims.net" utm_medium="web" utm_campaign="promotion" utm_content="button" utm_term="request a quote"]How to enable UTM URL properties to dynamically update the CB form from landing pages.
You need to update the form shortcode to allow it to accept UTM properties from the URL.
To do this:
- Go to the Shortcode Generator.
- Re-add your previous options.
- Then add the UTM support option as shown in the screenshot below. And generate the shortcode.
If you replace your current shortcode with the newly generated one, the form will then be able to dynamically capture UTM parameters from landing page URLs.
Suppose the previous shortcode is the one mentioned in the earlier sections.
The new shortcode should be:
[jims_wpcb_booking_form hide_logo=1 contained=1 show_country=0 show_info_text=0 service_ids="921,693" accept_url_params="1" allowed_url_params="utmSource,utmMedium,utmCampaign,utmContent,utmTerm" utm_source="jims.net" utm_medium="web" utm_campaign="promotion" utm_content="button" utm_term="request a quote"]Please note that UTM properties are not updated for previous leads.
If the client is an existing Jim’s client, the source string in FMS doesn’t get updated, and the original lead source remains unchanged.
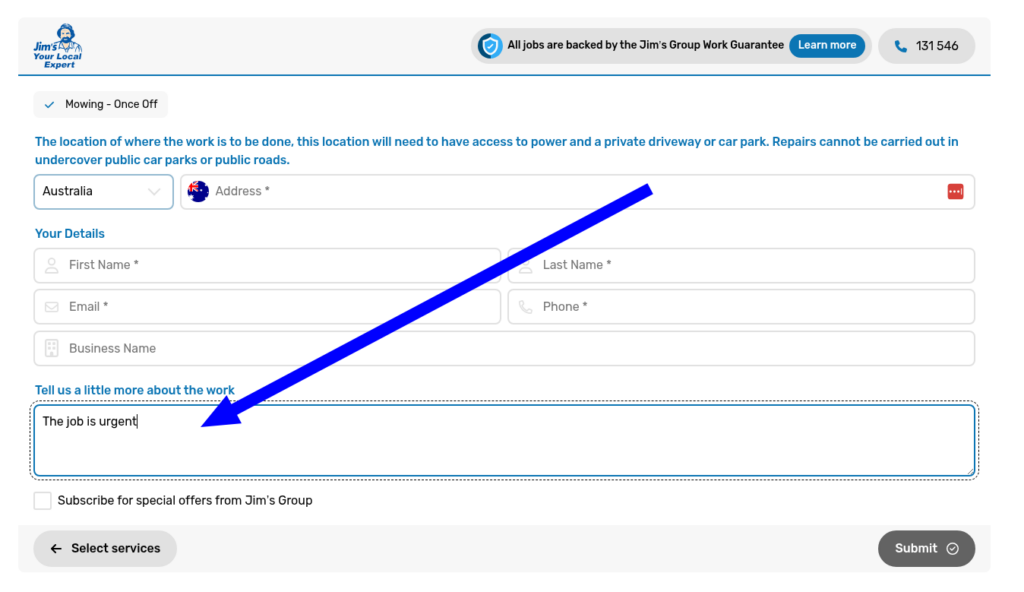
Add Prefilled Message or Promo code
You can go to the Shortcode Generator, scroll down to the Text Overrides section, and locate the Message field. There, you can update it with the custom message of your choice.
Please note that the following special characters are not allowed in this field:
@#$%^&*_+={}[]/|<>'":~`Make sure to use only alphanumeric characters and basic punctuation to avoid issues.
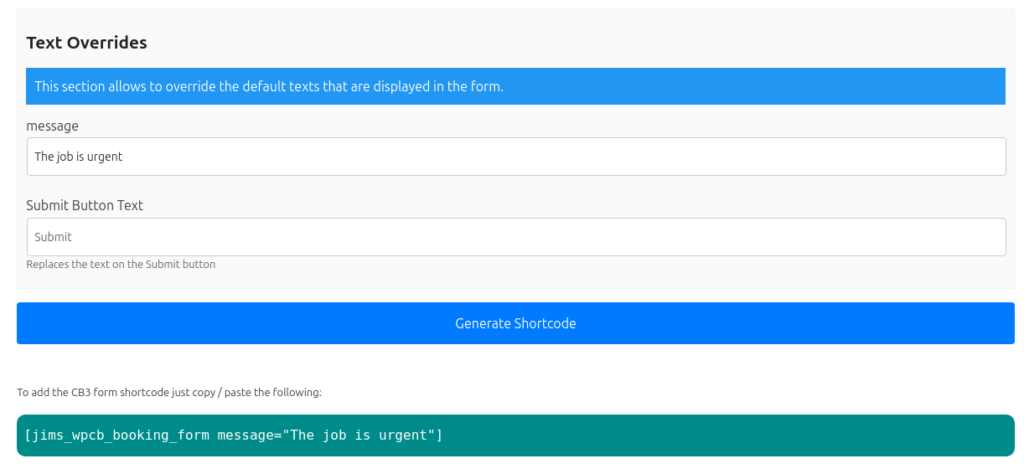
This will show up here:
You can alternatively add it as an accepted URL property, allowing the message to be pre-filled dynamically via the URL when the form loads.
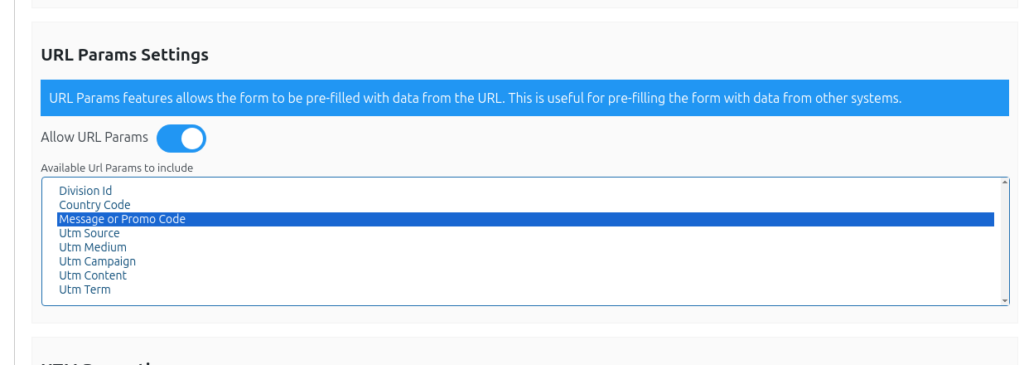
This will produce the following shortcode:
[jims_wpcb_booking_form accept_url_params="1" allowed_url_params="msg"]This way, if you create a button on any page with a link like the following (note: the text "my awesome job" is URL encoded):
https://{{mysite}}/request-a-quote?msg=my%20awesome%20jobThe feature above can also be used as a way to pass promotion codes to the form.
Since the message field is included in the notification sent to the selected franchisee, you can use it to identify leads that came through a specific promotion—making it easy for your franchisees to know the lead’s source.
However, it’s possible for a client to accidentally delete the promotion code from the message field.
To prevent this, we introduced the option to hide the message area—ensuring the code remains intact and the client can’t modify or remove it by mistake.
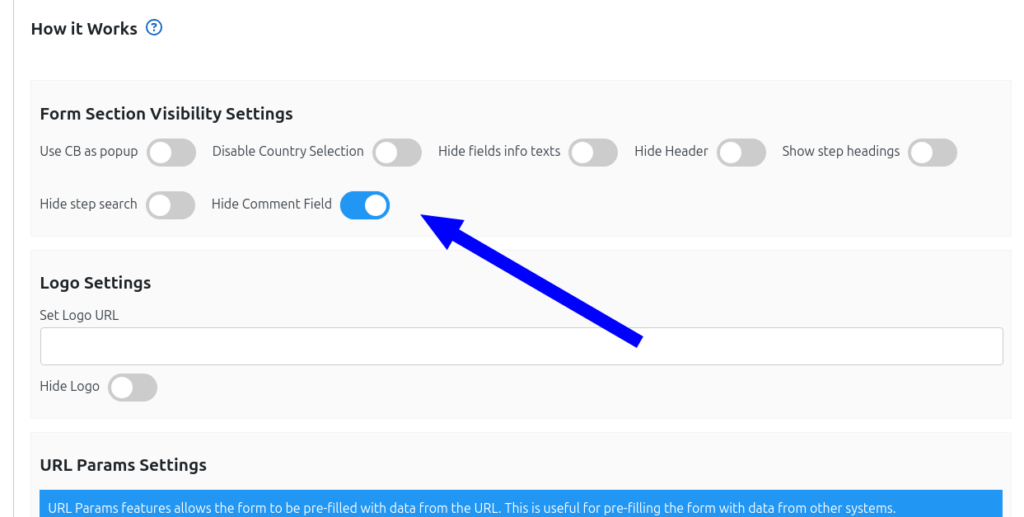
The produced shortcode should look like this:
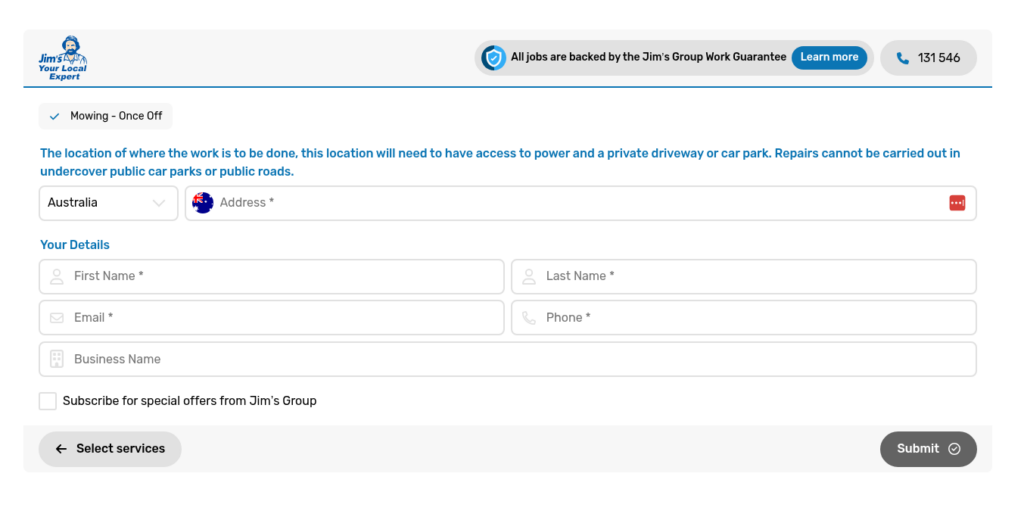
[jims_wpcb_booking_form hide_comment="1" accept_url_params="1" allowed_url_params="msg"]And the result will look like this:
6: Customer Booking Statistics
In this chapter, we explore the functionality that allows you to view customer booking statistics on the Customer Bookings page. This feature provides insights into the performance of your services, showing the number of successful and pending bookings for each service.
Access this page by following these steps:
- Log in to your WordPress admin dashboard.
- From the left-hand menu, navigate to the “Jim’s WPCB” menu item.
- Click on “Customer Bookings.”
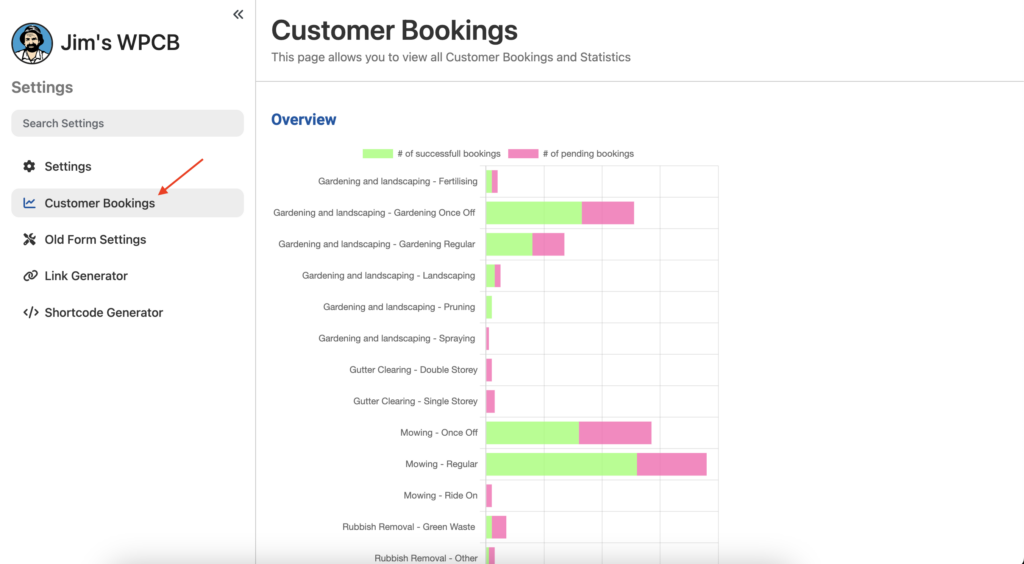
On the Customer Bookings page, you’ll find a detailed breakdown of your booking statistics. This breakdown includes information about each service’s performance:
- Service Name: Lists the names of the services that customers have booked.
- Successful Bookings: Displays the total number of successful bookings for each service.
- Pending Bookings: Shows the count of pending bookings awaiting confirmation.
This overview enables you to assess the popularity of your services and identify areas that may require attention. It also offers insights into booking trends and patterns, aiding you in making informed decisions for your franchise business.
7. Setup Google Analytics for CB3
This section will guide you through seamlessly integrating Google Analytics with the Jim’s WPCB plugin, allowing you to effortlessly track vital events associated with the booking form. Google Analytics provides invaluable insights into user interactions on your website, offering the information you need to optimize your booking process.
Google Analytics Tracking
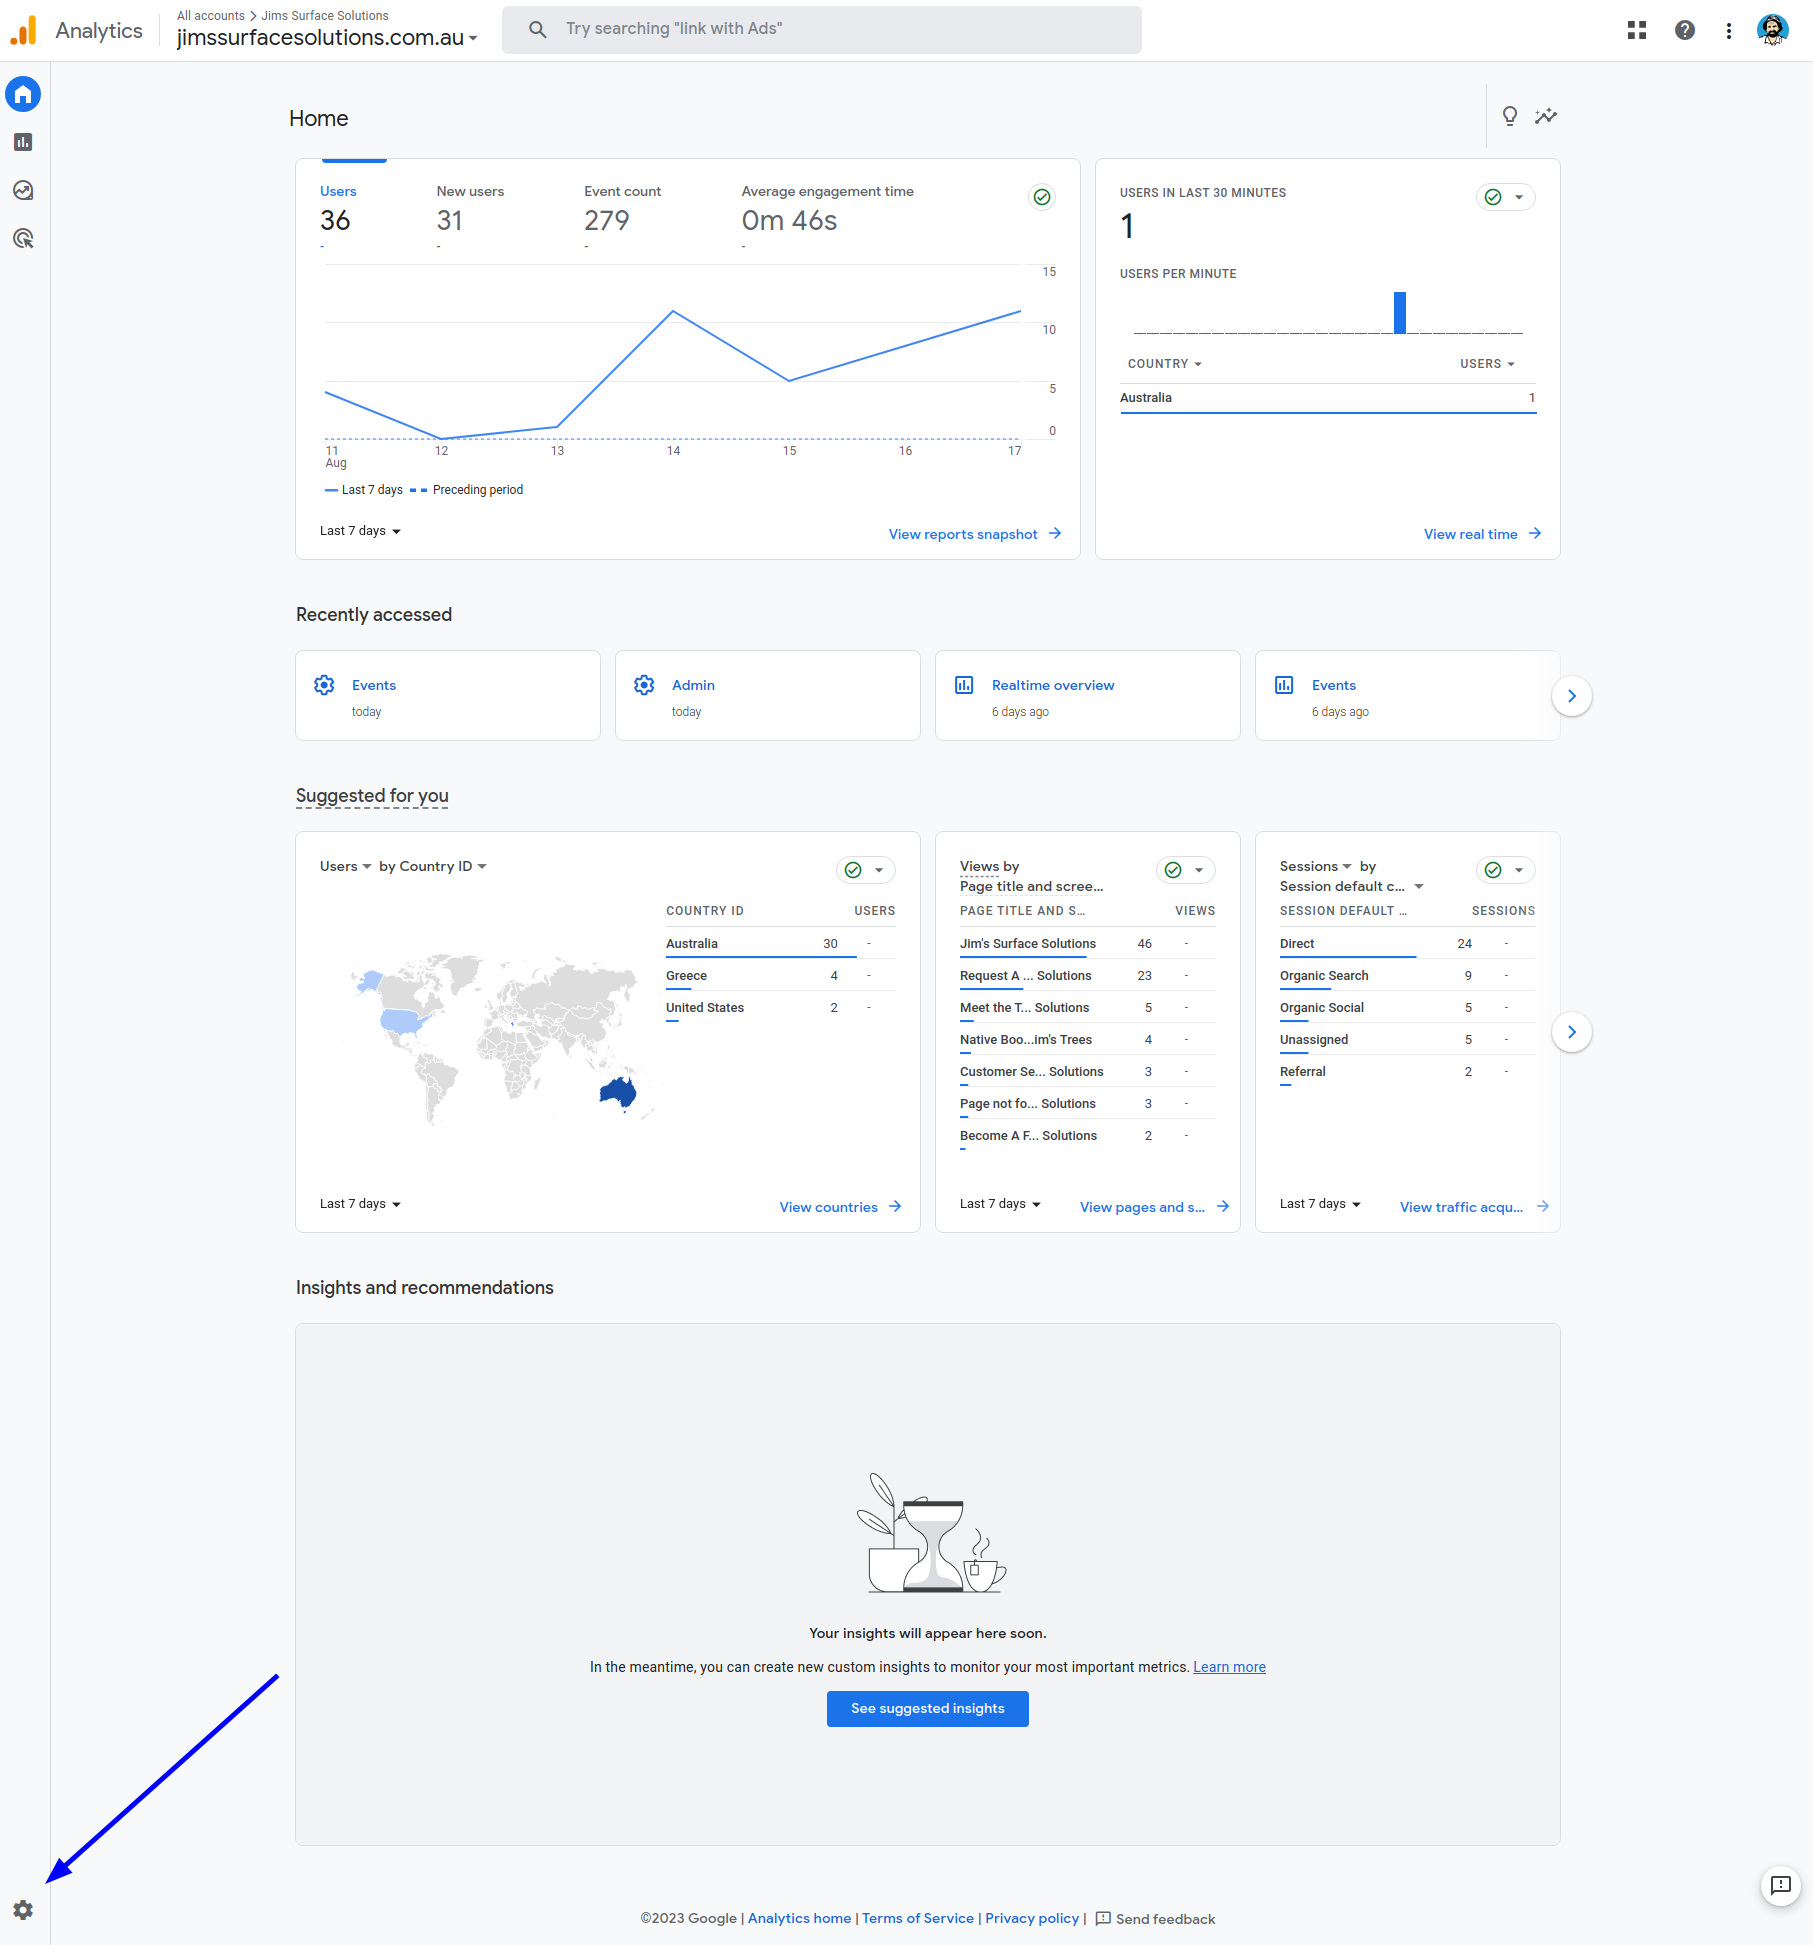
If you are already using Google Analytics on your website, the events generated by the native WPCB CB3 form will automatically be visible in your Google Analytics account’s event tracking section. These events provide you with valuable data to refine your booking process, identify areas for enhancement, and ensure your booking system optimally serves your customers.
Creating Conversions from events
The form submission events are not immediately considered as conversions. To recognize them as such, the analytics account must be configured. The administrator of the analytics account needs to create Events and then designate them as conversions.
In the analytics account, click on Admin.
Next, click to Events
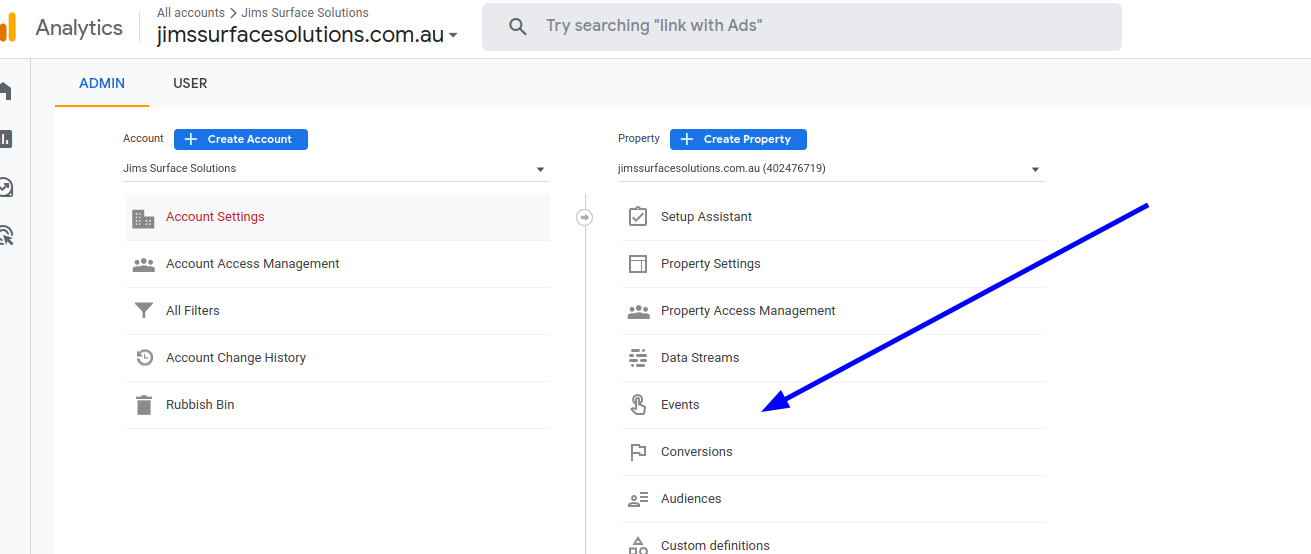
And Create the Events: Booking and Booking Form Step
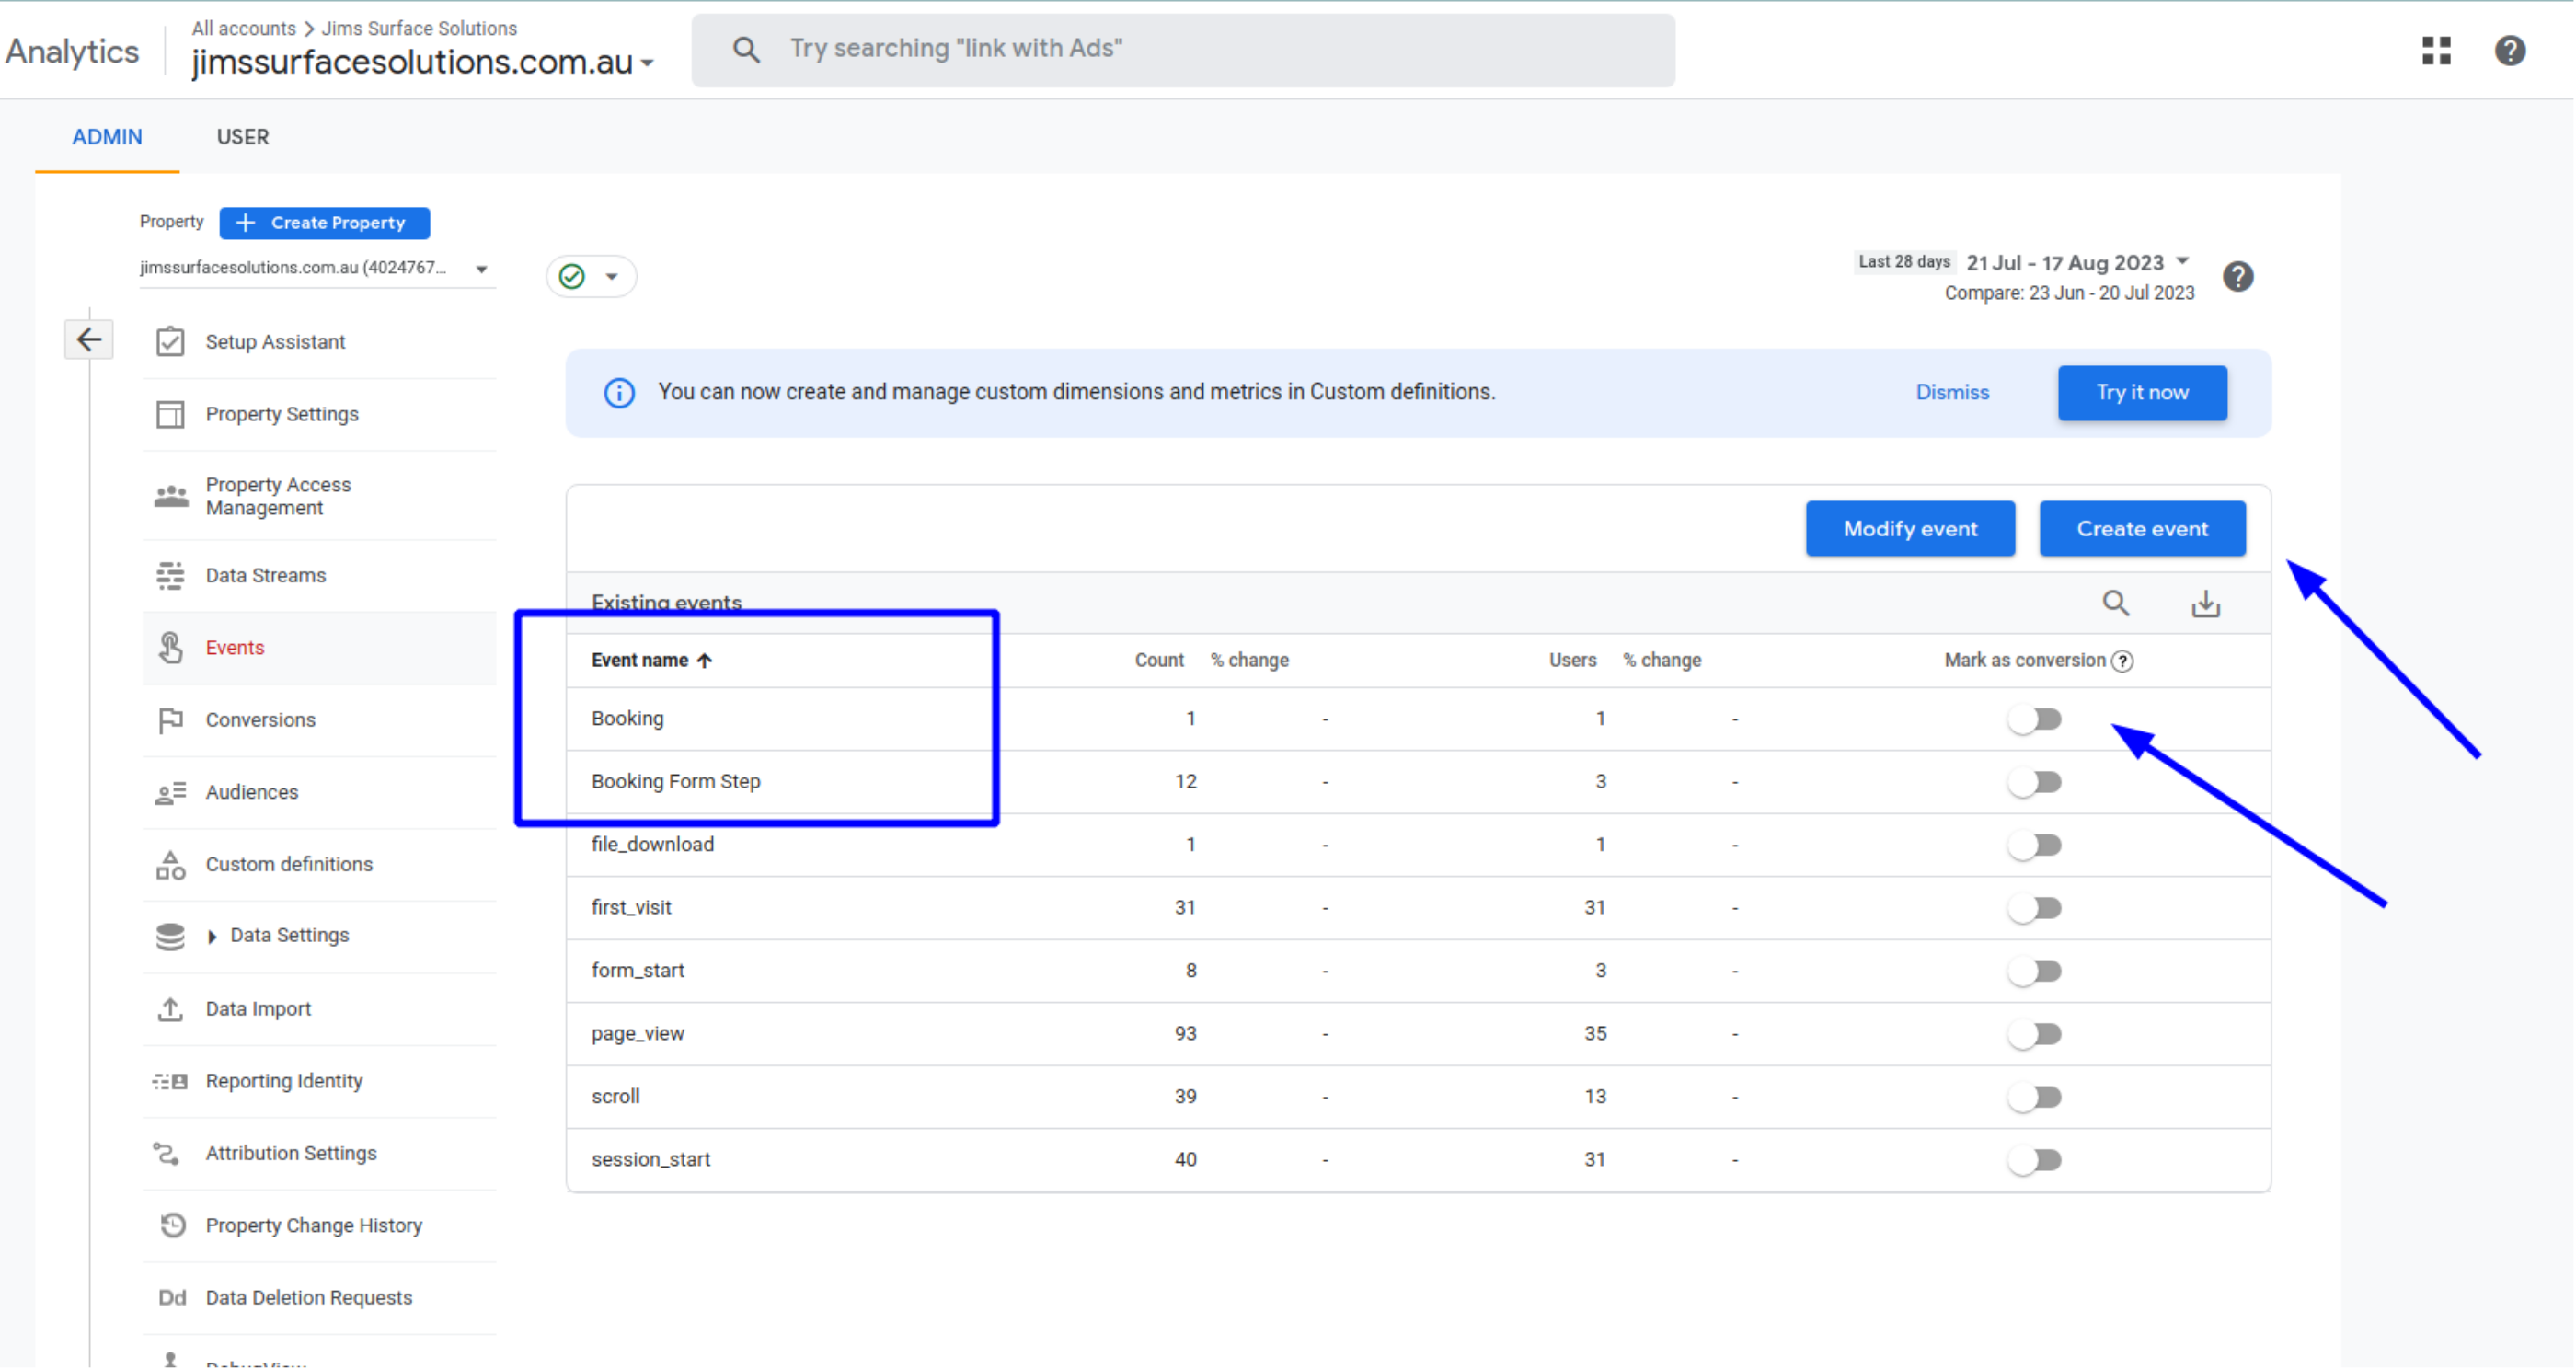
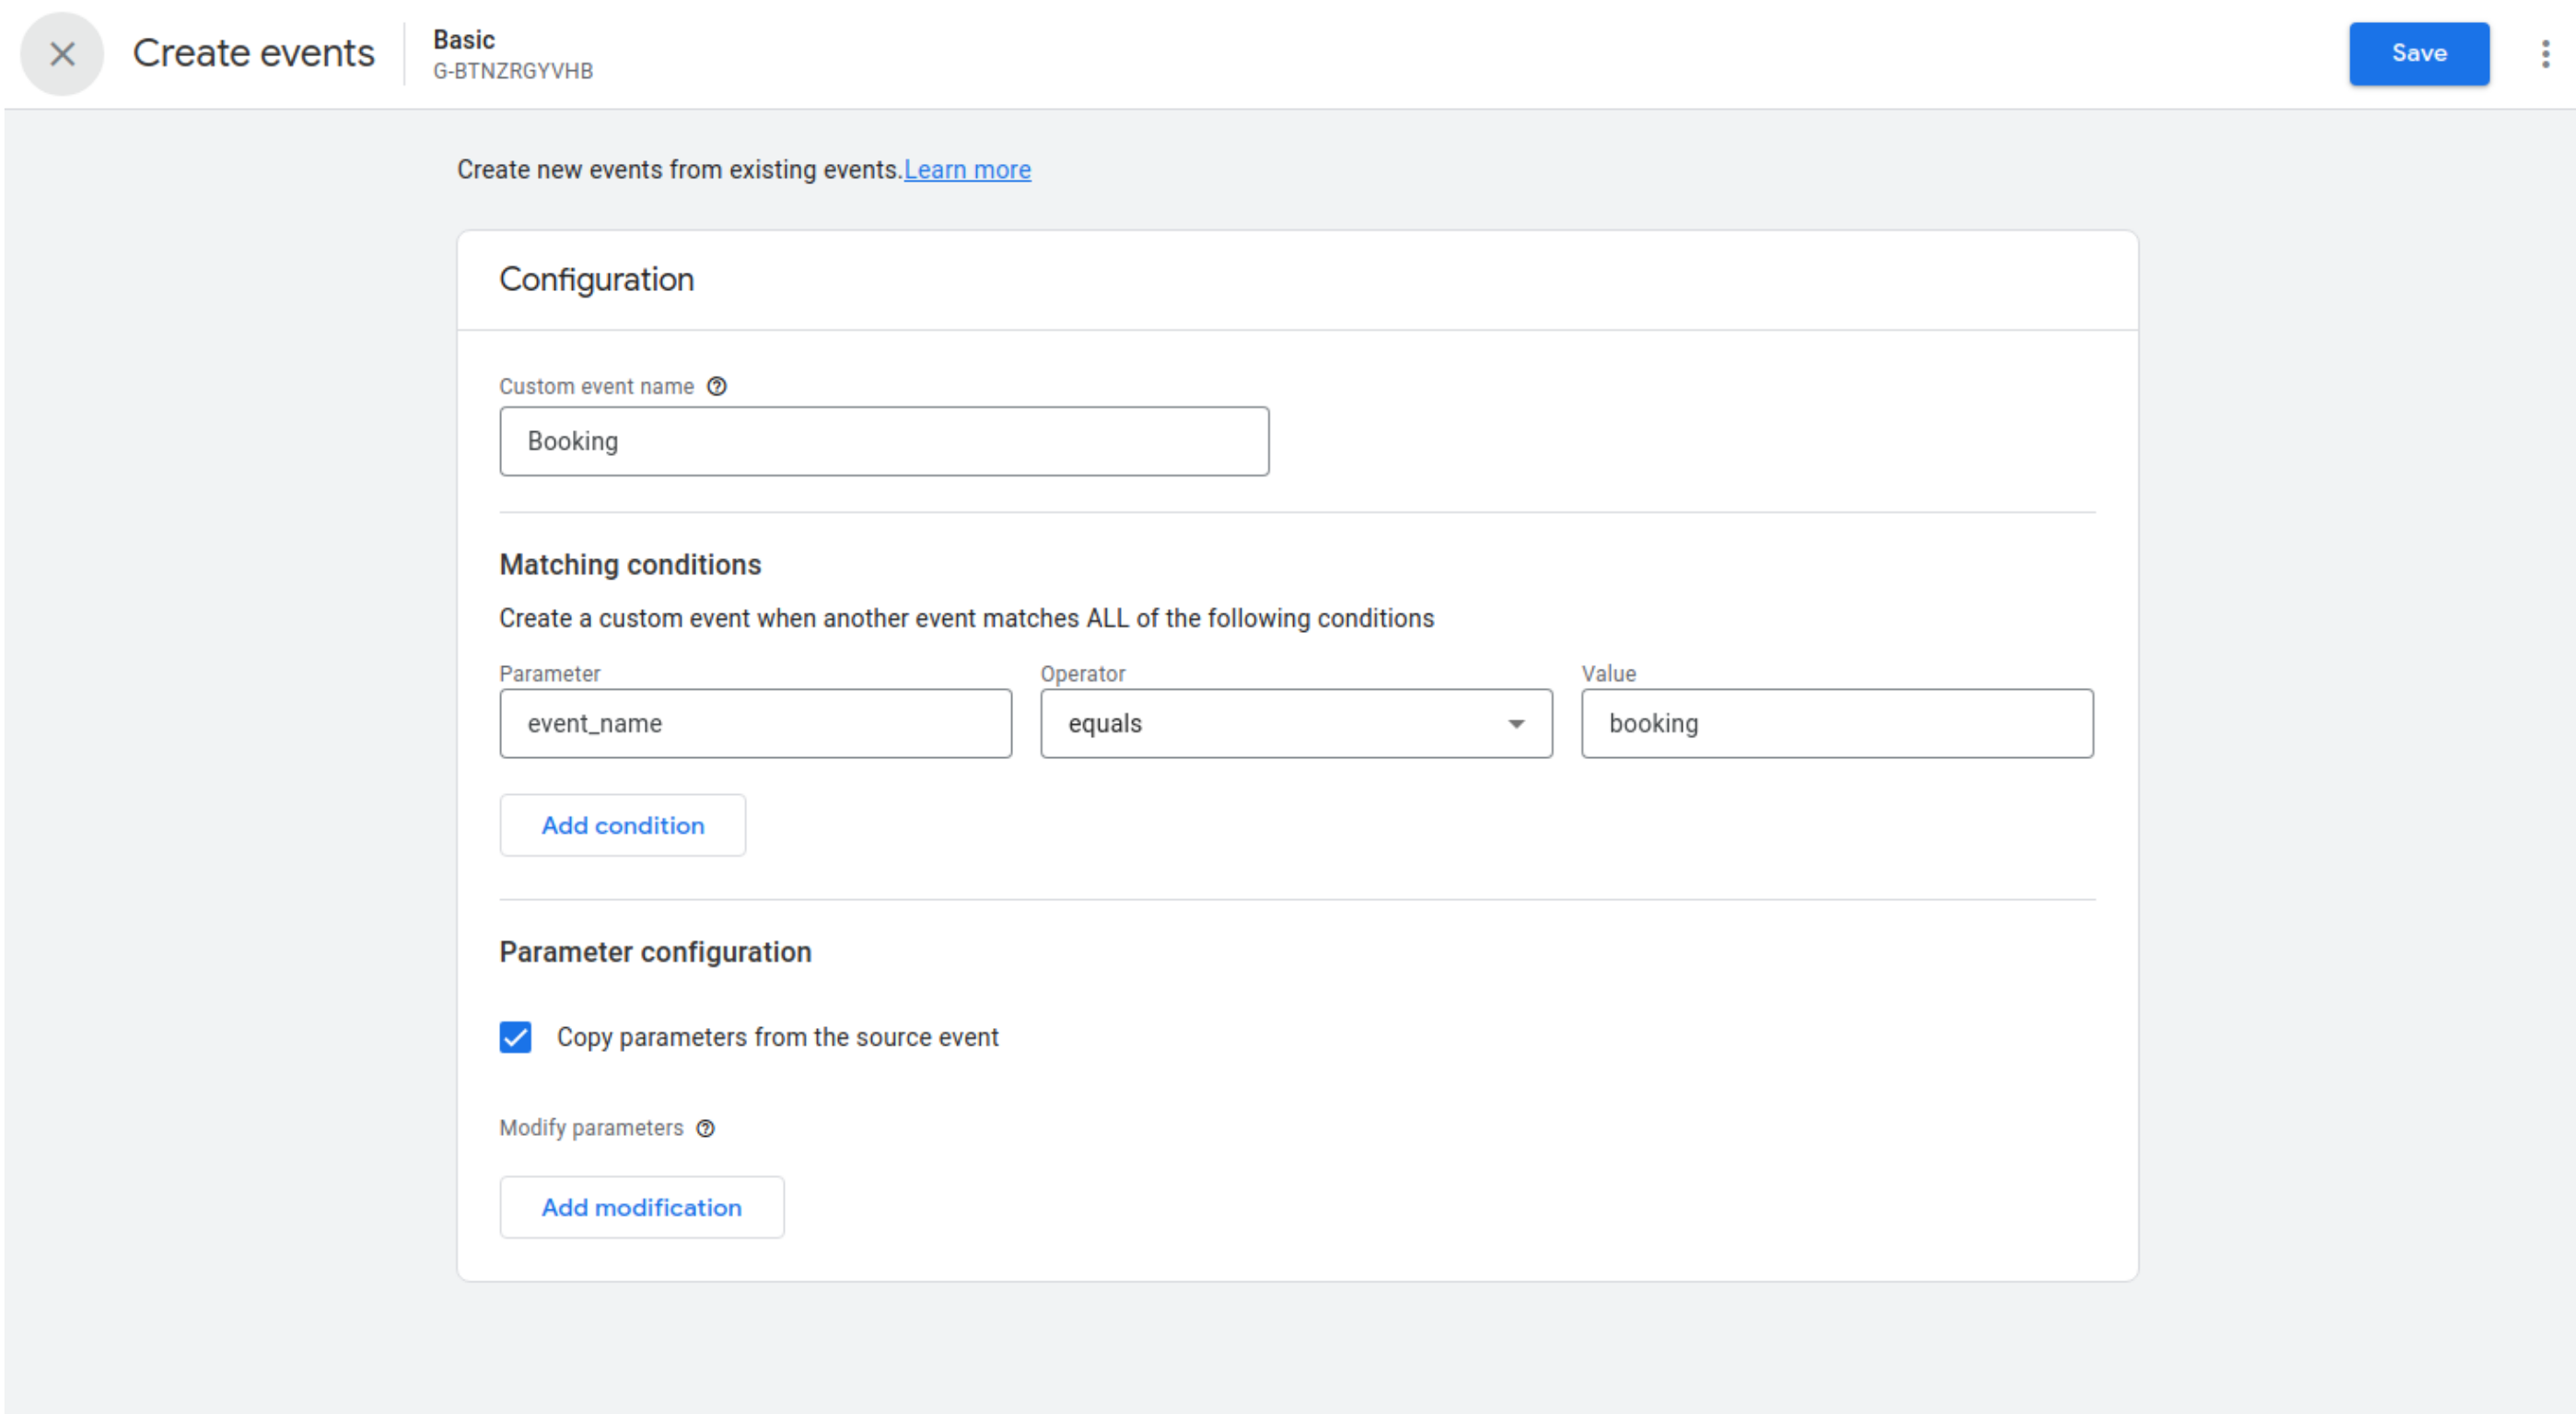
The available event names are:
- booking-step on each booking step
- booking-submit on clicking the form submit button
- booking on form successful booking
Now you can determine which events should be considered as conversions by toggling the switch button next to the desired event.
Google Tag Manager Integration
For those utilizing Google Tag Manager, you’ll need to perform a simple configuration to view these events. Click the “Download Configuration” button below and import the configuration into your Google Tag Manager account. This step ensures that the events from the native WPCB CB3 form are displayed within Google Tag Manager, enabling you to monitor and leverage these insights for strategic decision-making.
How to successfully import the configuration file
(This guide assumes that the Tag Manager is in its default state with no prior configurations. If you have already set up some tags and triggers, you may need to skip certain steps)
Make sure you have created a GA4 Streaming ID before starting following the guide. The streaming Id can be created within the analytics account.
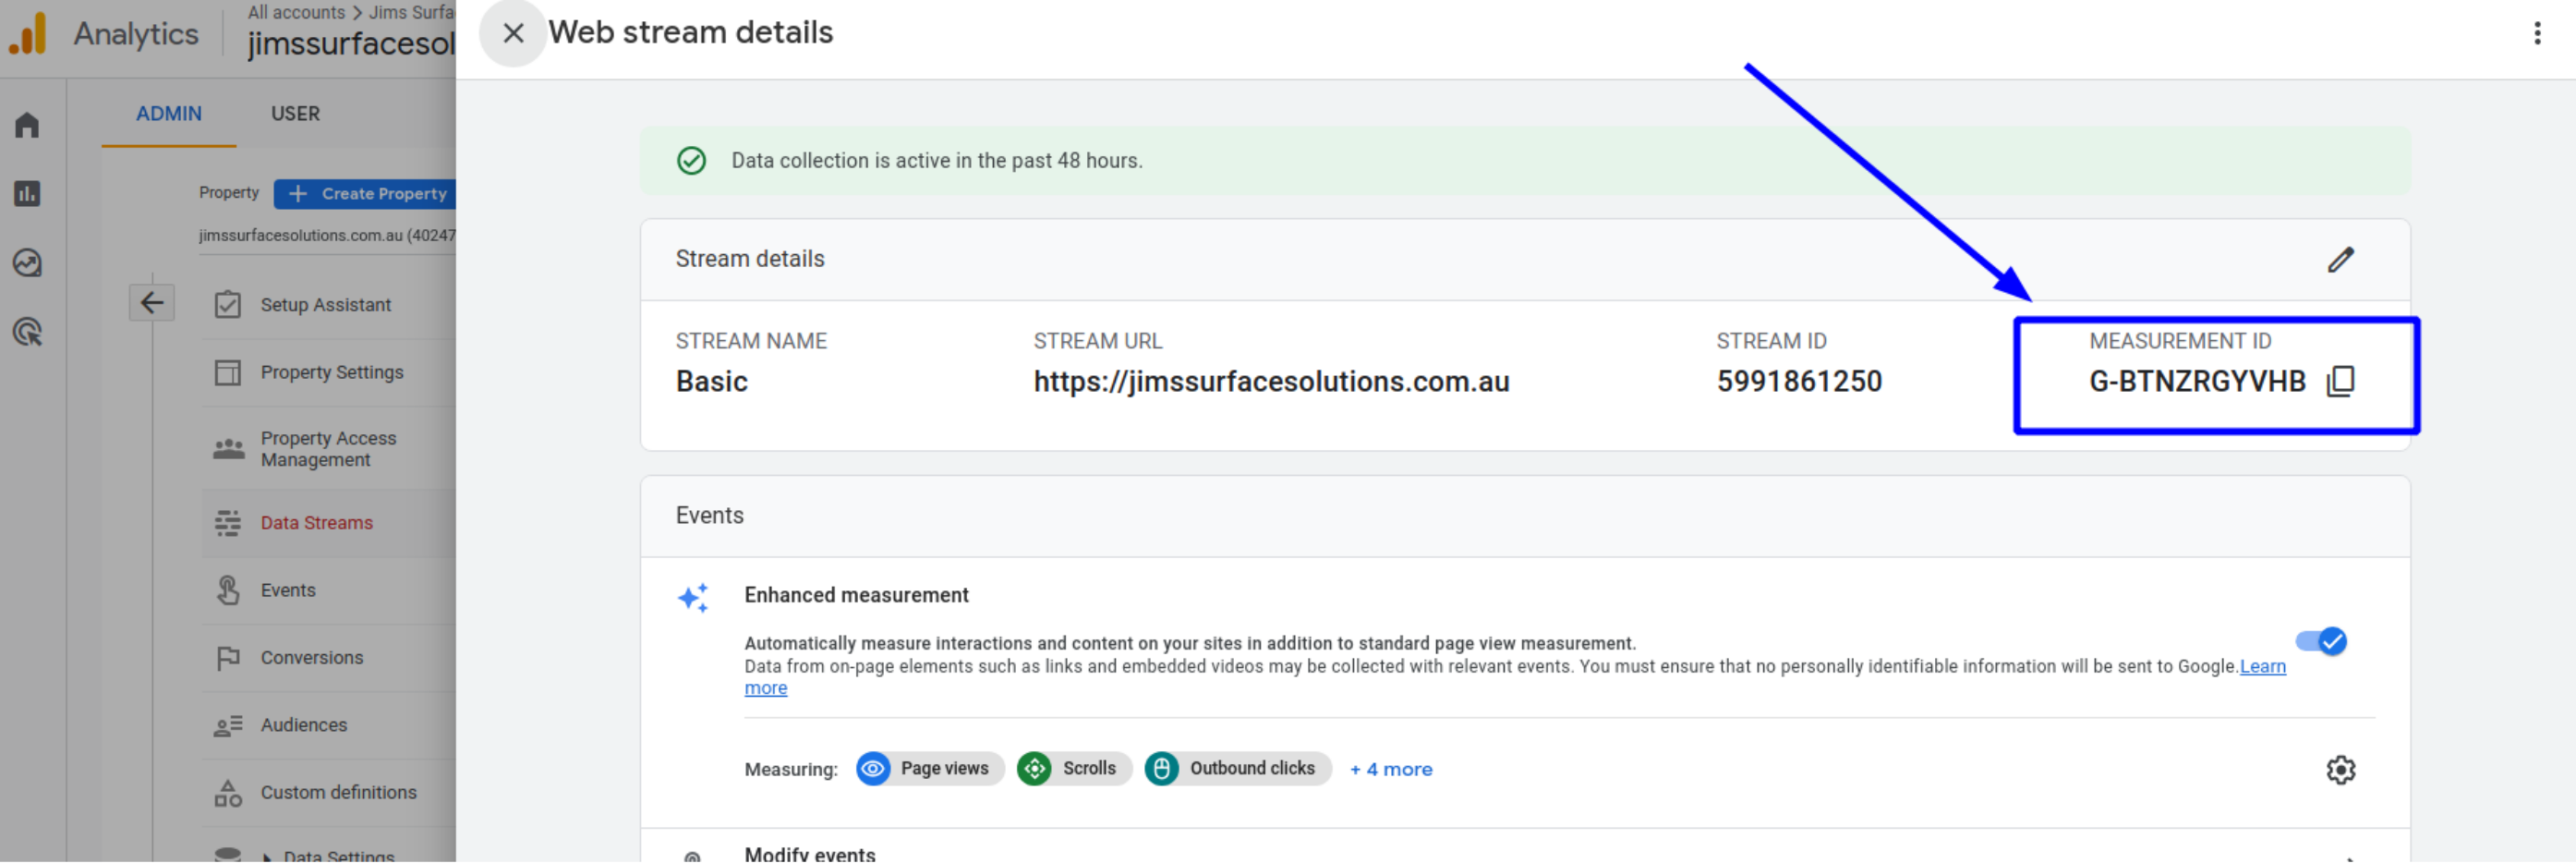
(this is for jimssurfacesolutions website, please follow the google instructions to create for your own website https://support.google.com/analytics/answer/9304153?hl=en )
Import the configuration file
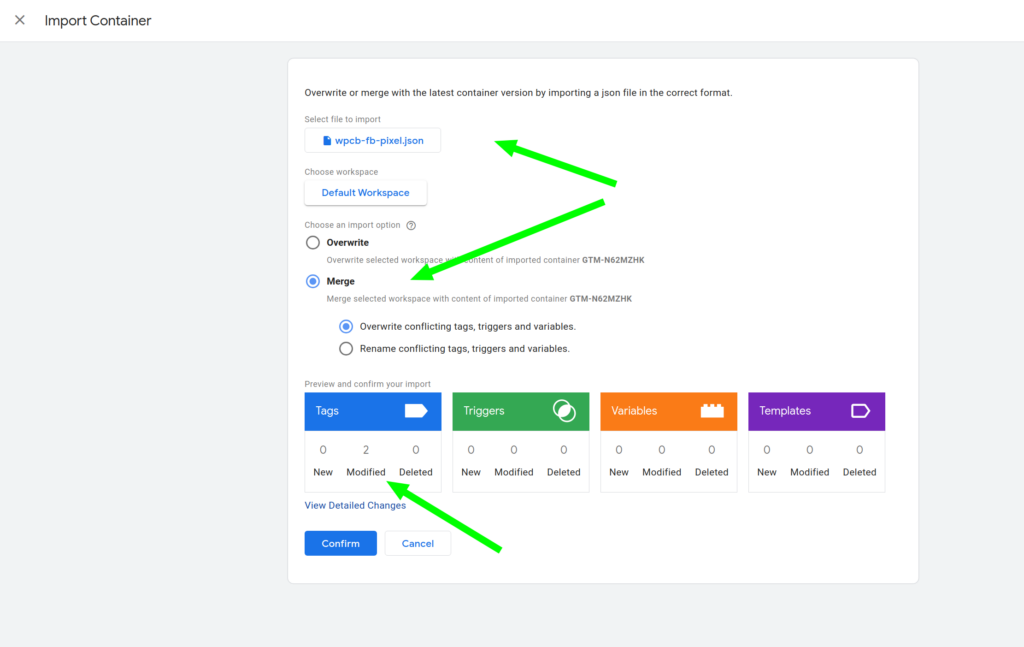
Download the configuration file mentioned above. On your Google Tag Manager Account go to Admin

Select Import Container
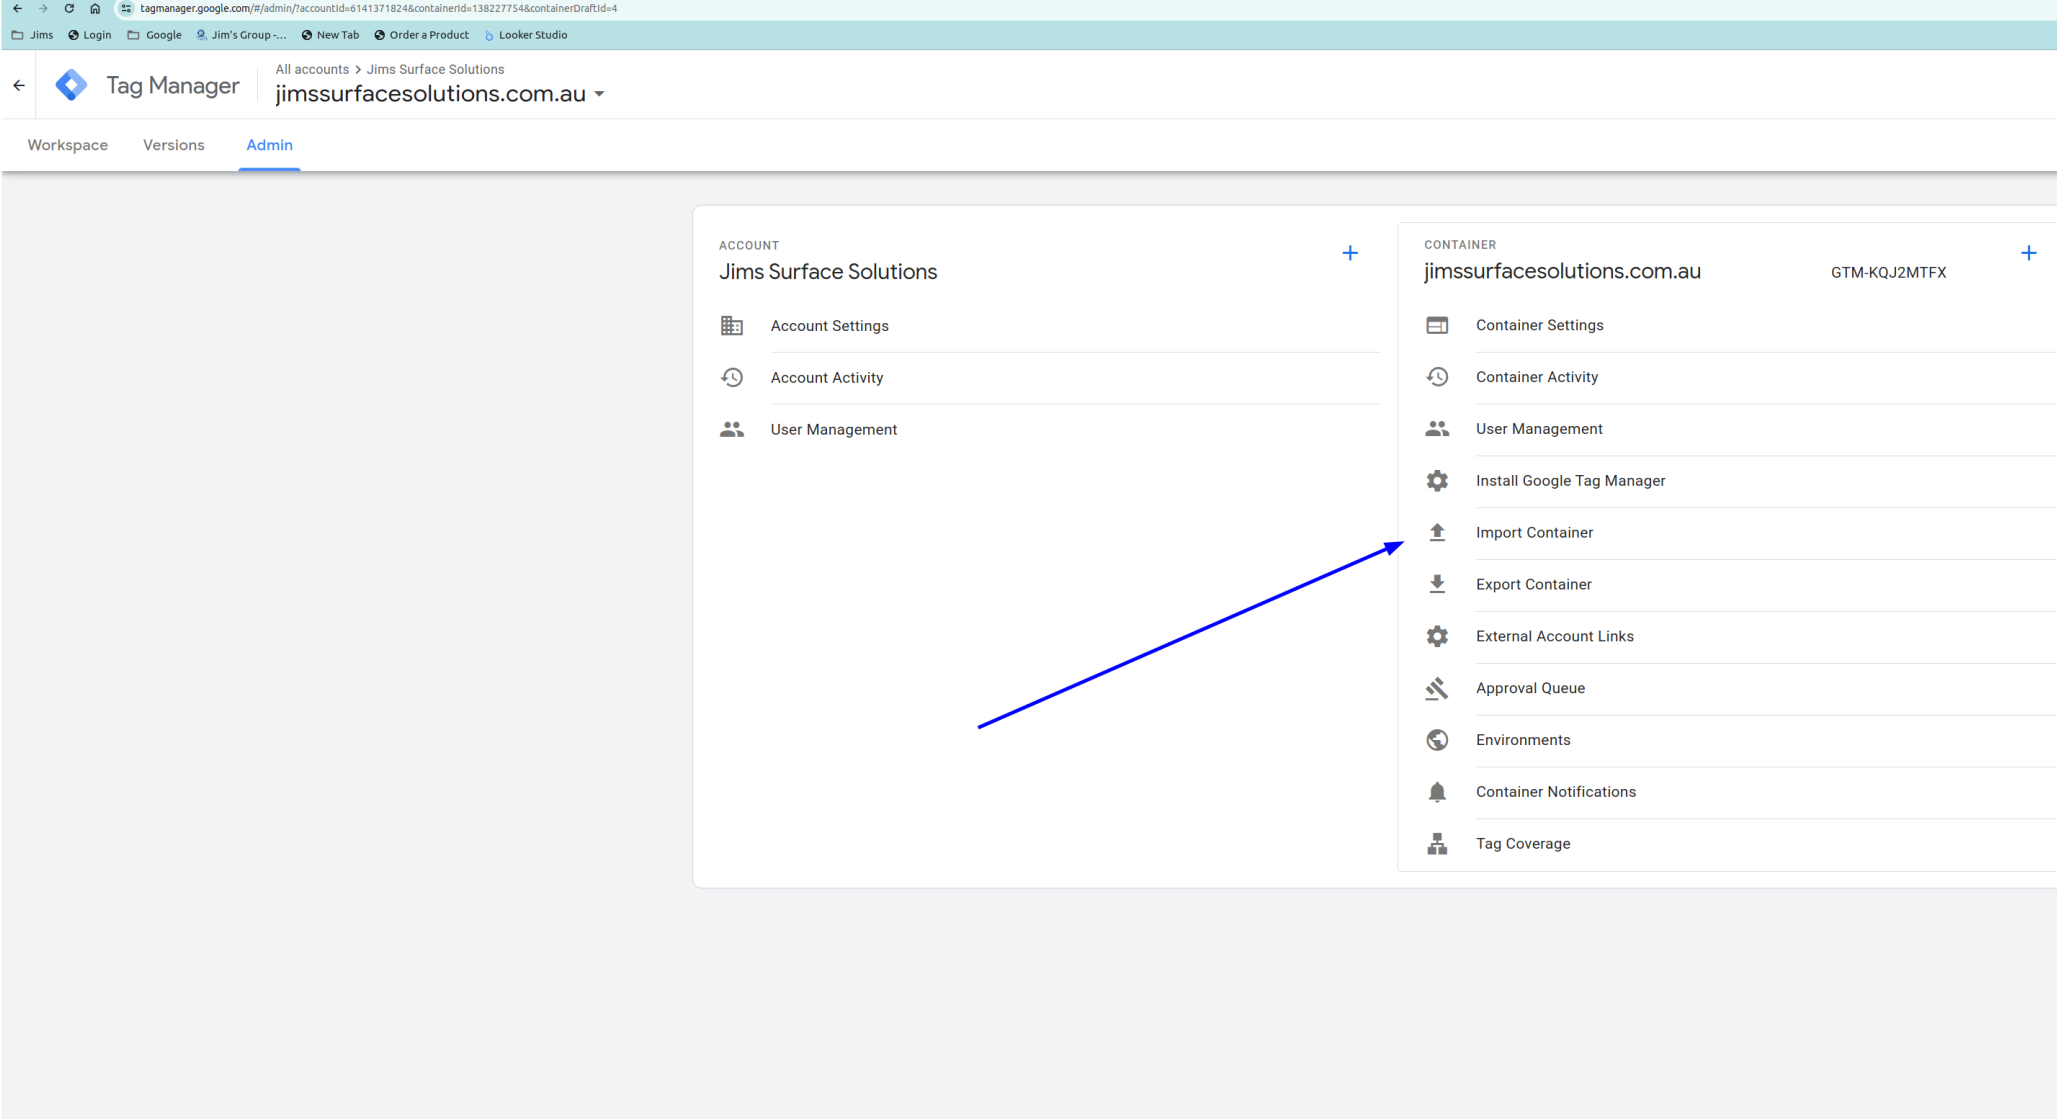
Select the file to Import by clicking on appropriate button, select the options as showed on the following screenshot.
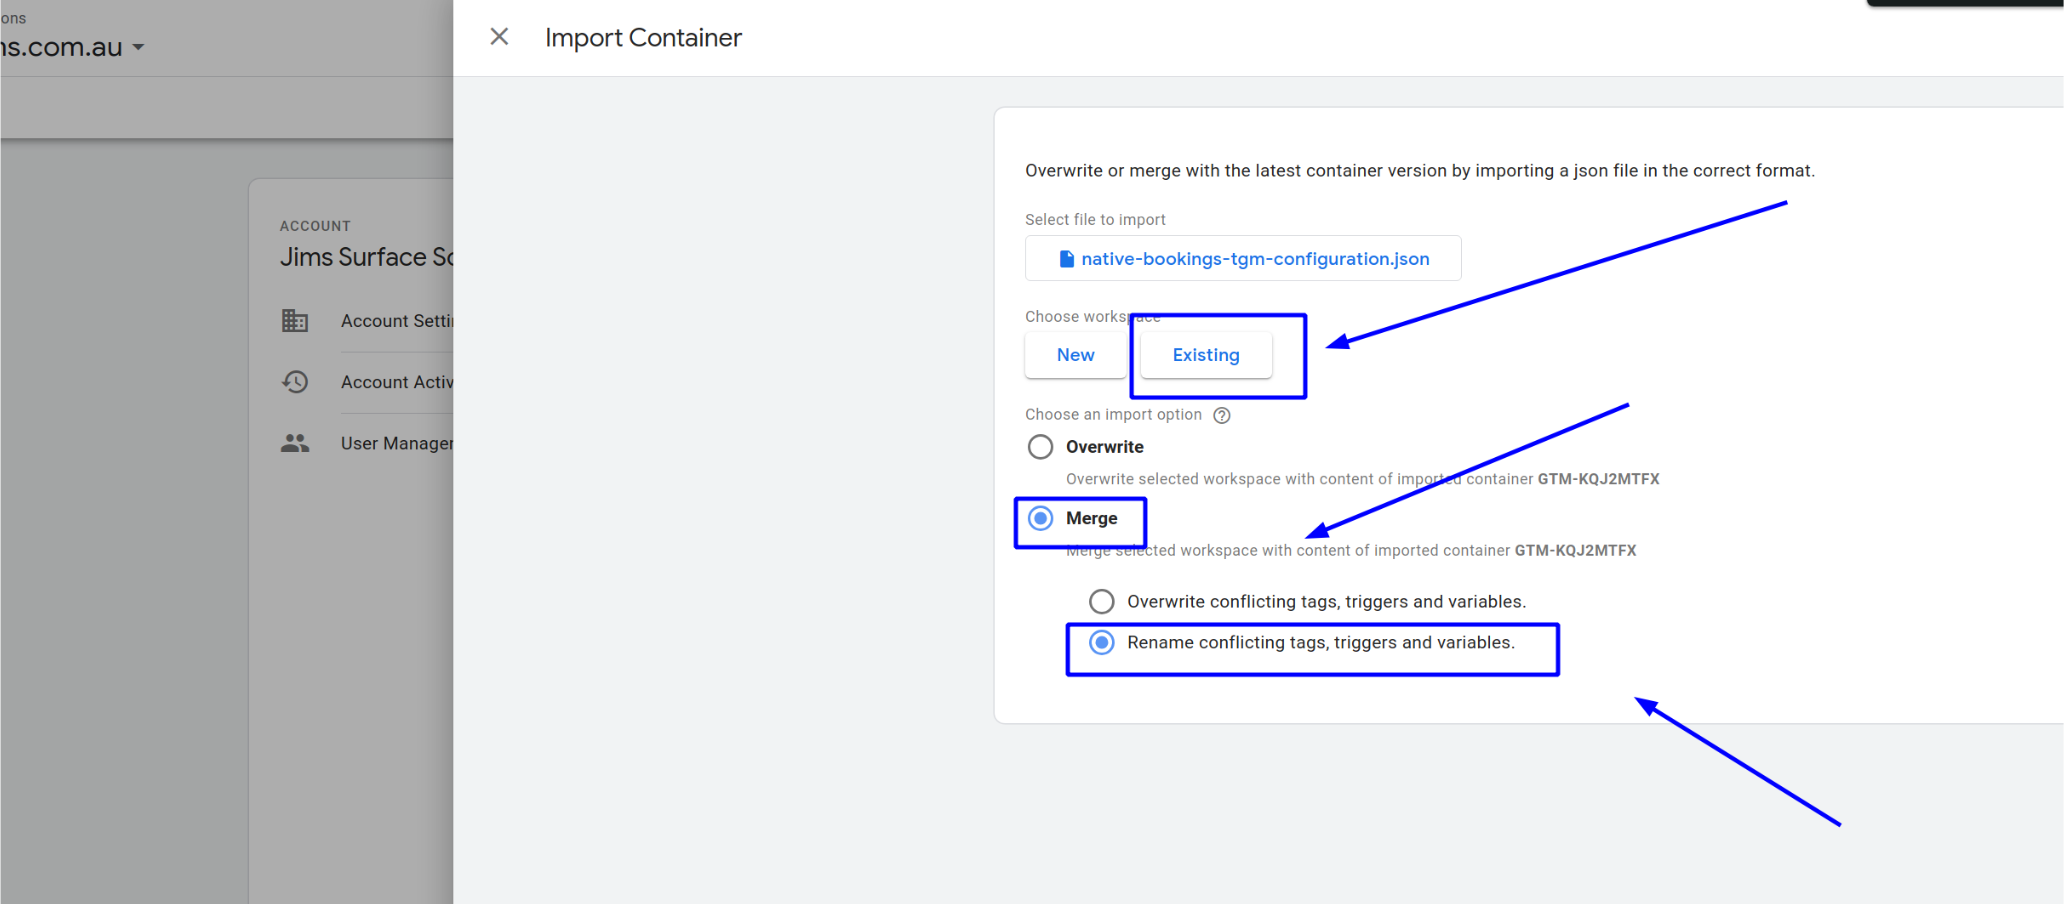
The final screen should like this:
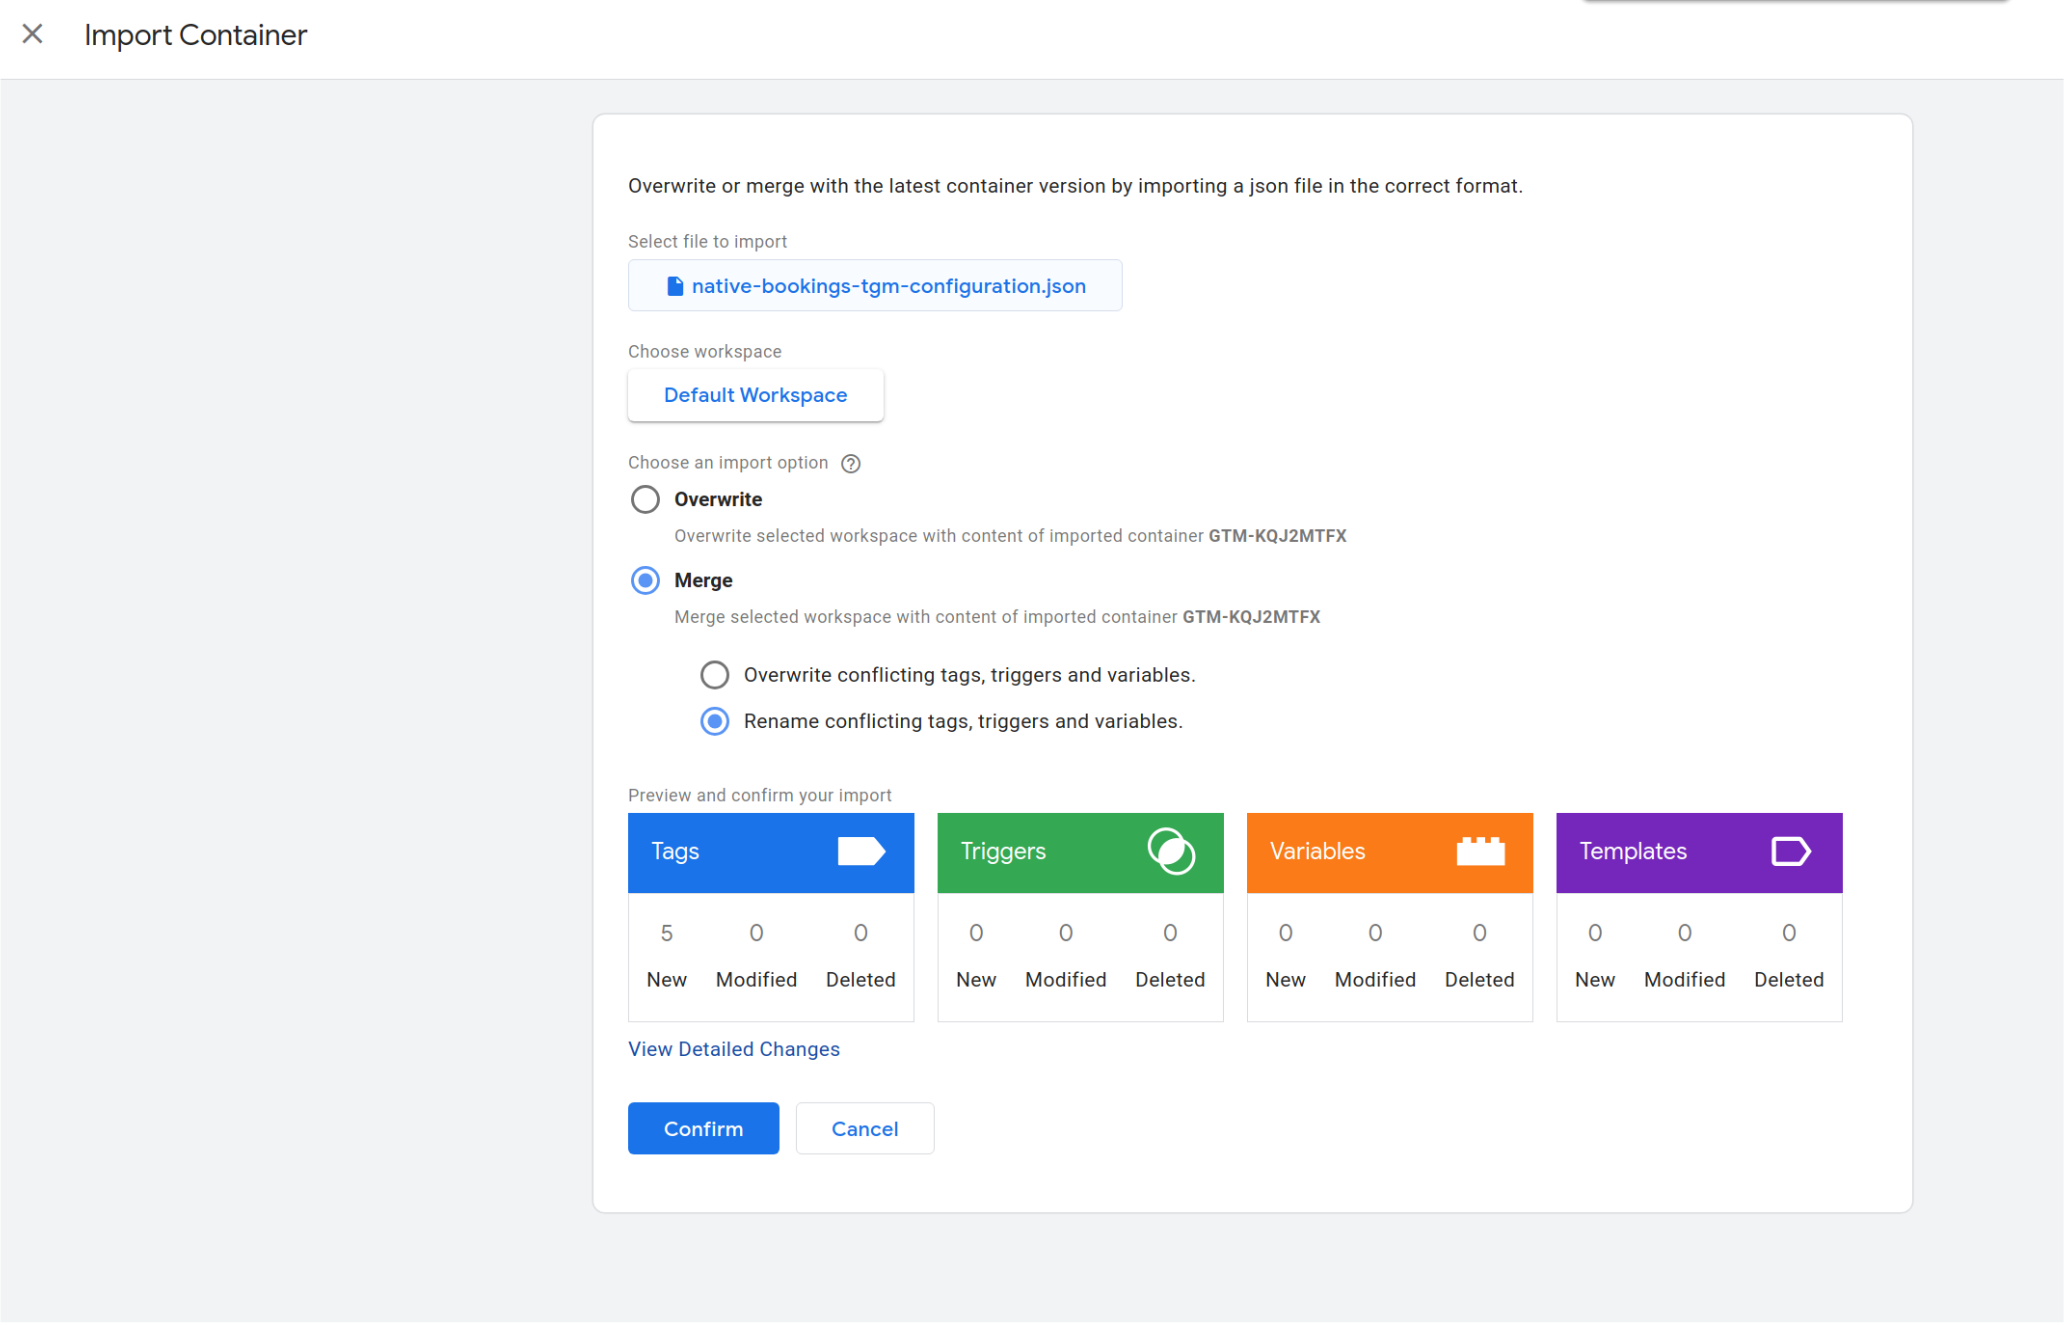
If, for instance, you’ve previously set up a Tag for PageViews in this account, consider merging it rather than renaming. After importing, you can assign the configuration to the cb3 events.
Changing the GA4 streaming ID
By default, the configuration file is simply an export from a successfully configured account. Consequently, the GA4 streaming ID is associated with that original account. Therefore, it’s essential to modify it.
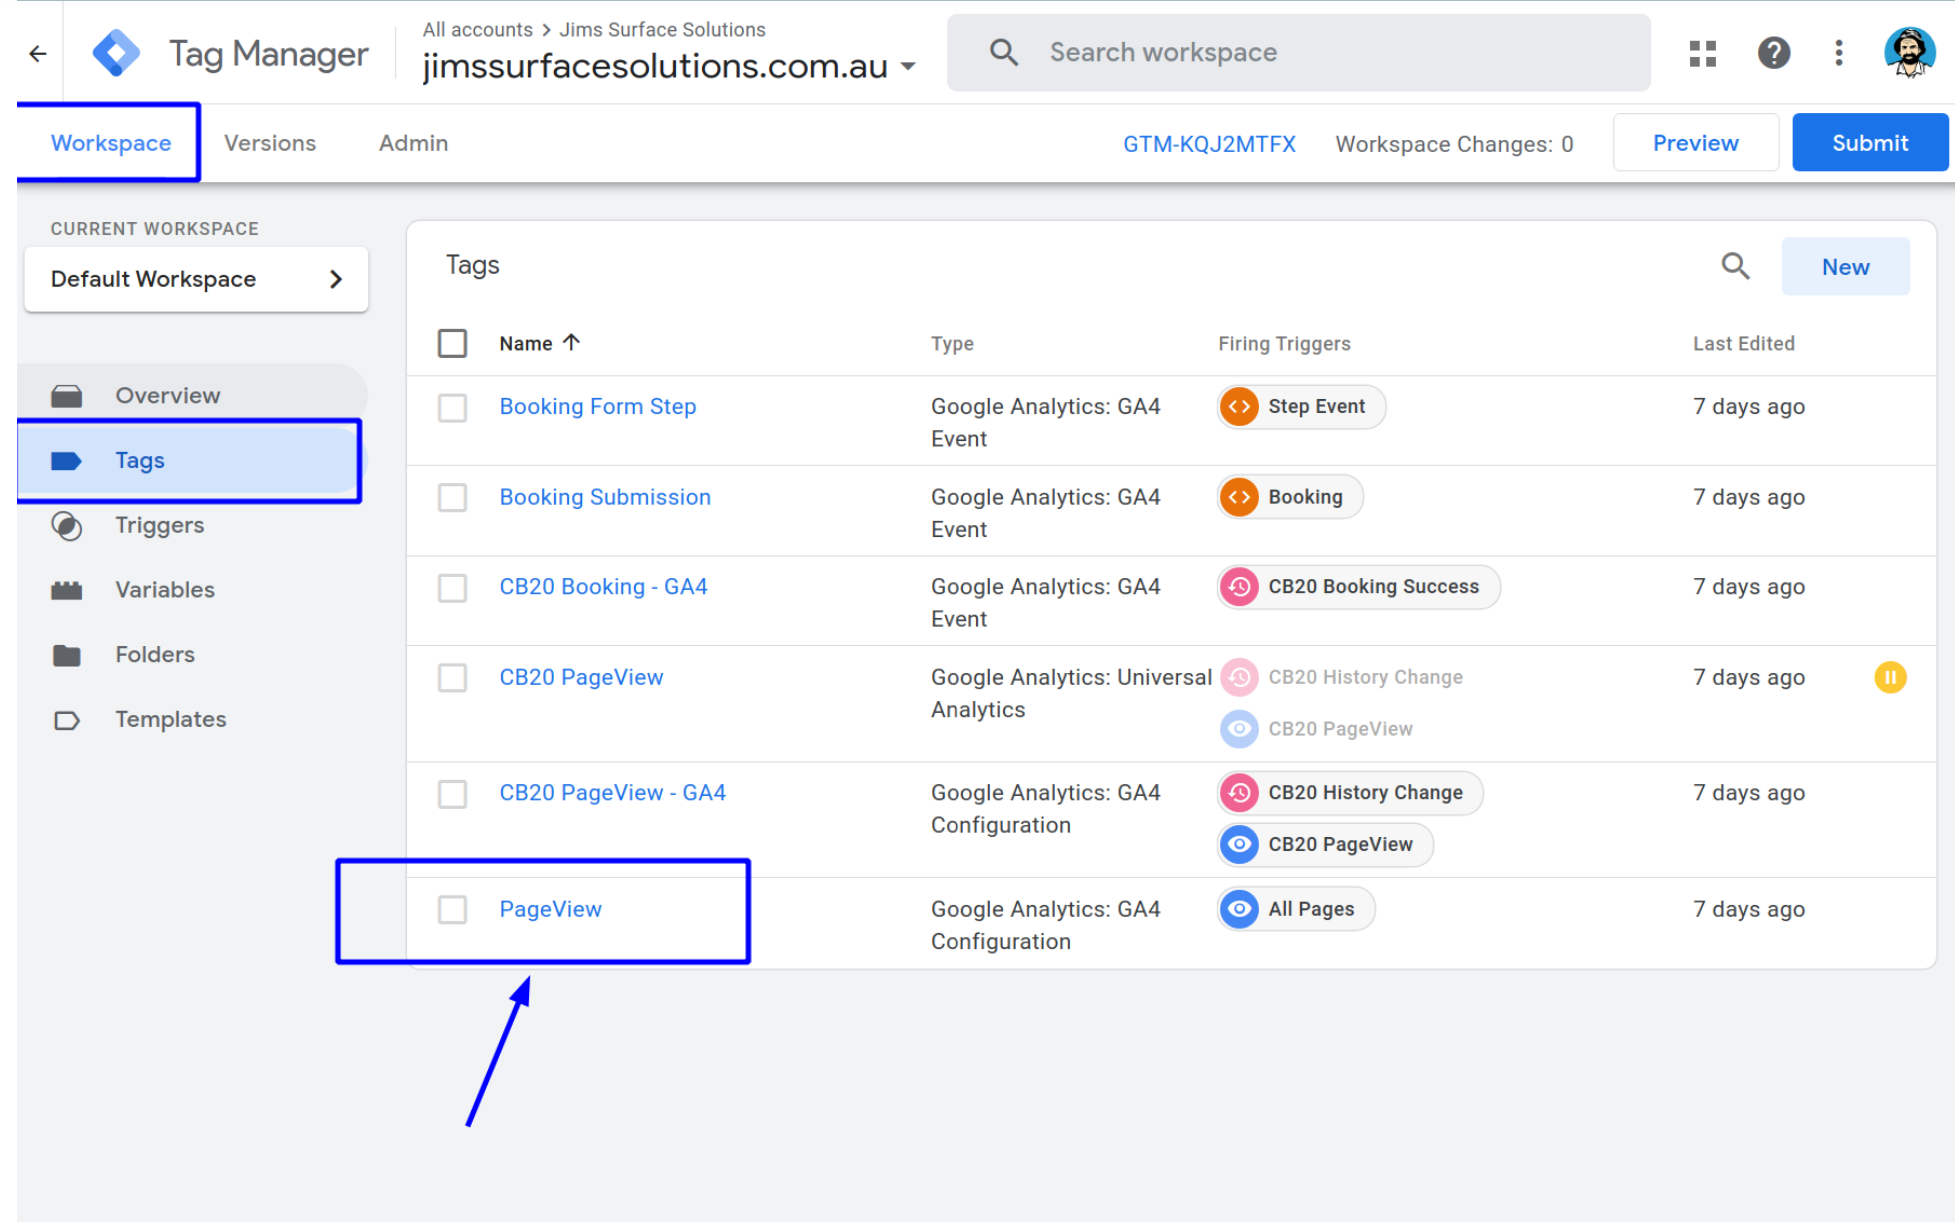
Go to the WorkSpace tab, select Tags, and then choose PageView.
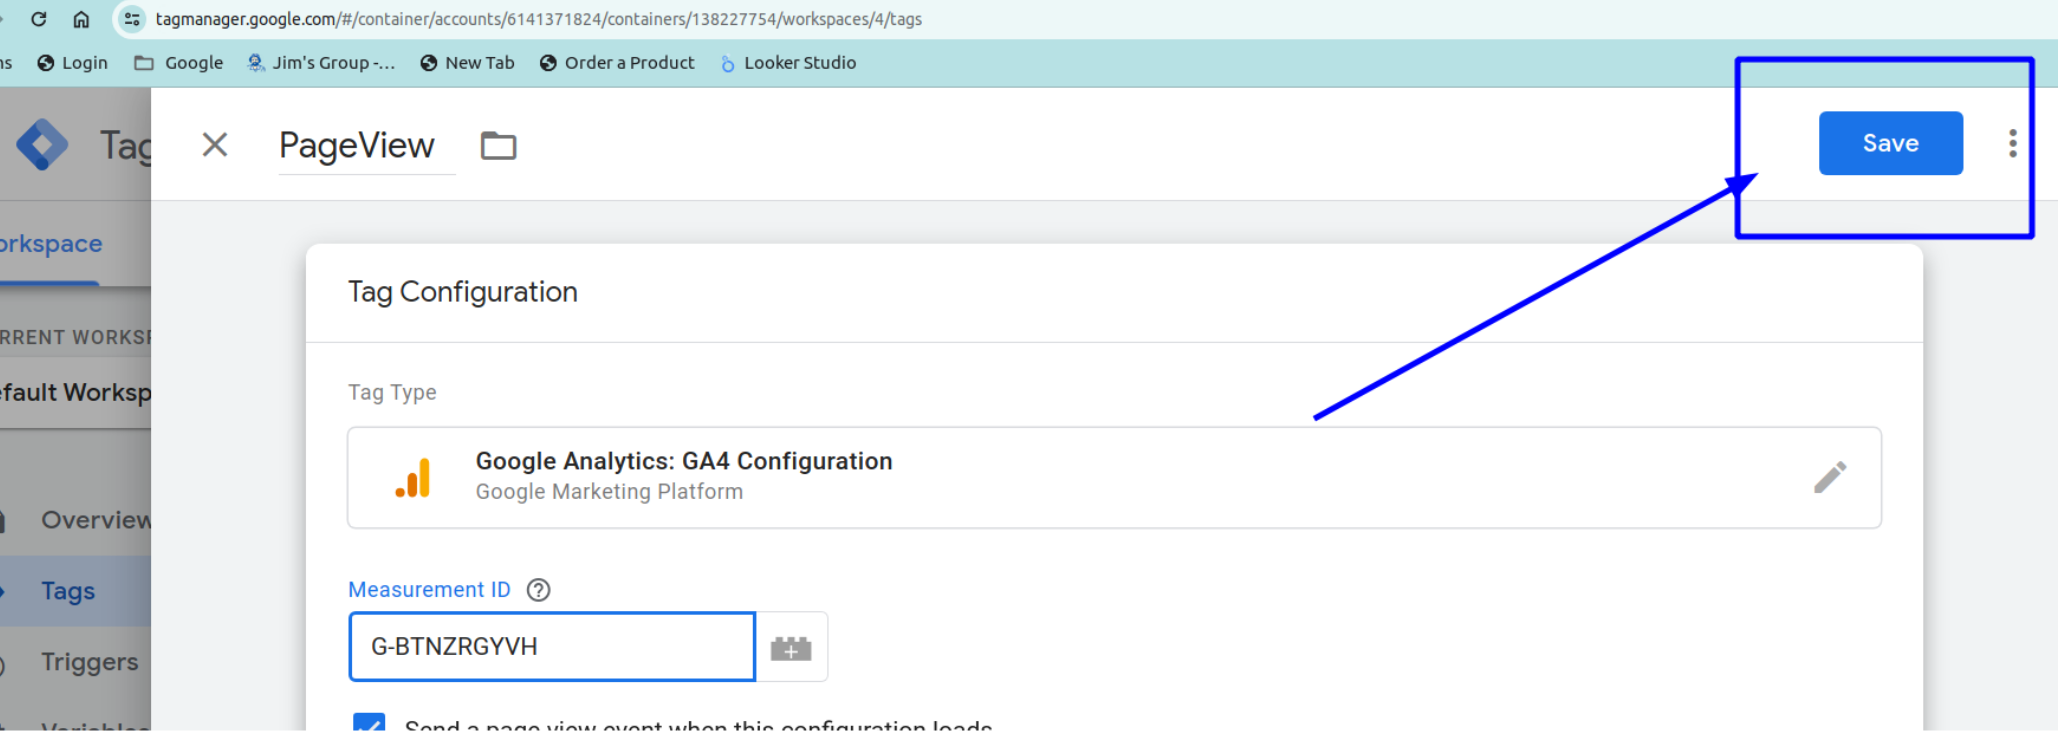
On PageView Panel, click on the steaming ID and replace it with you own.
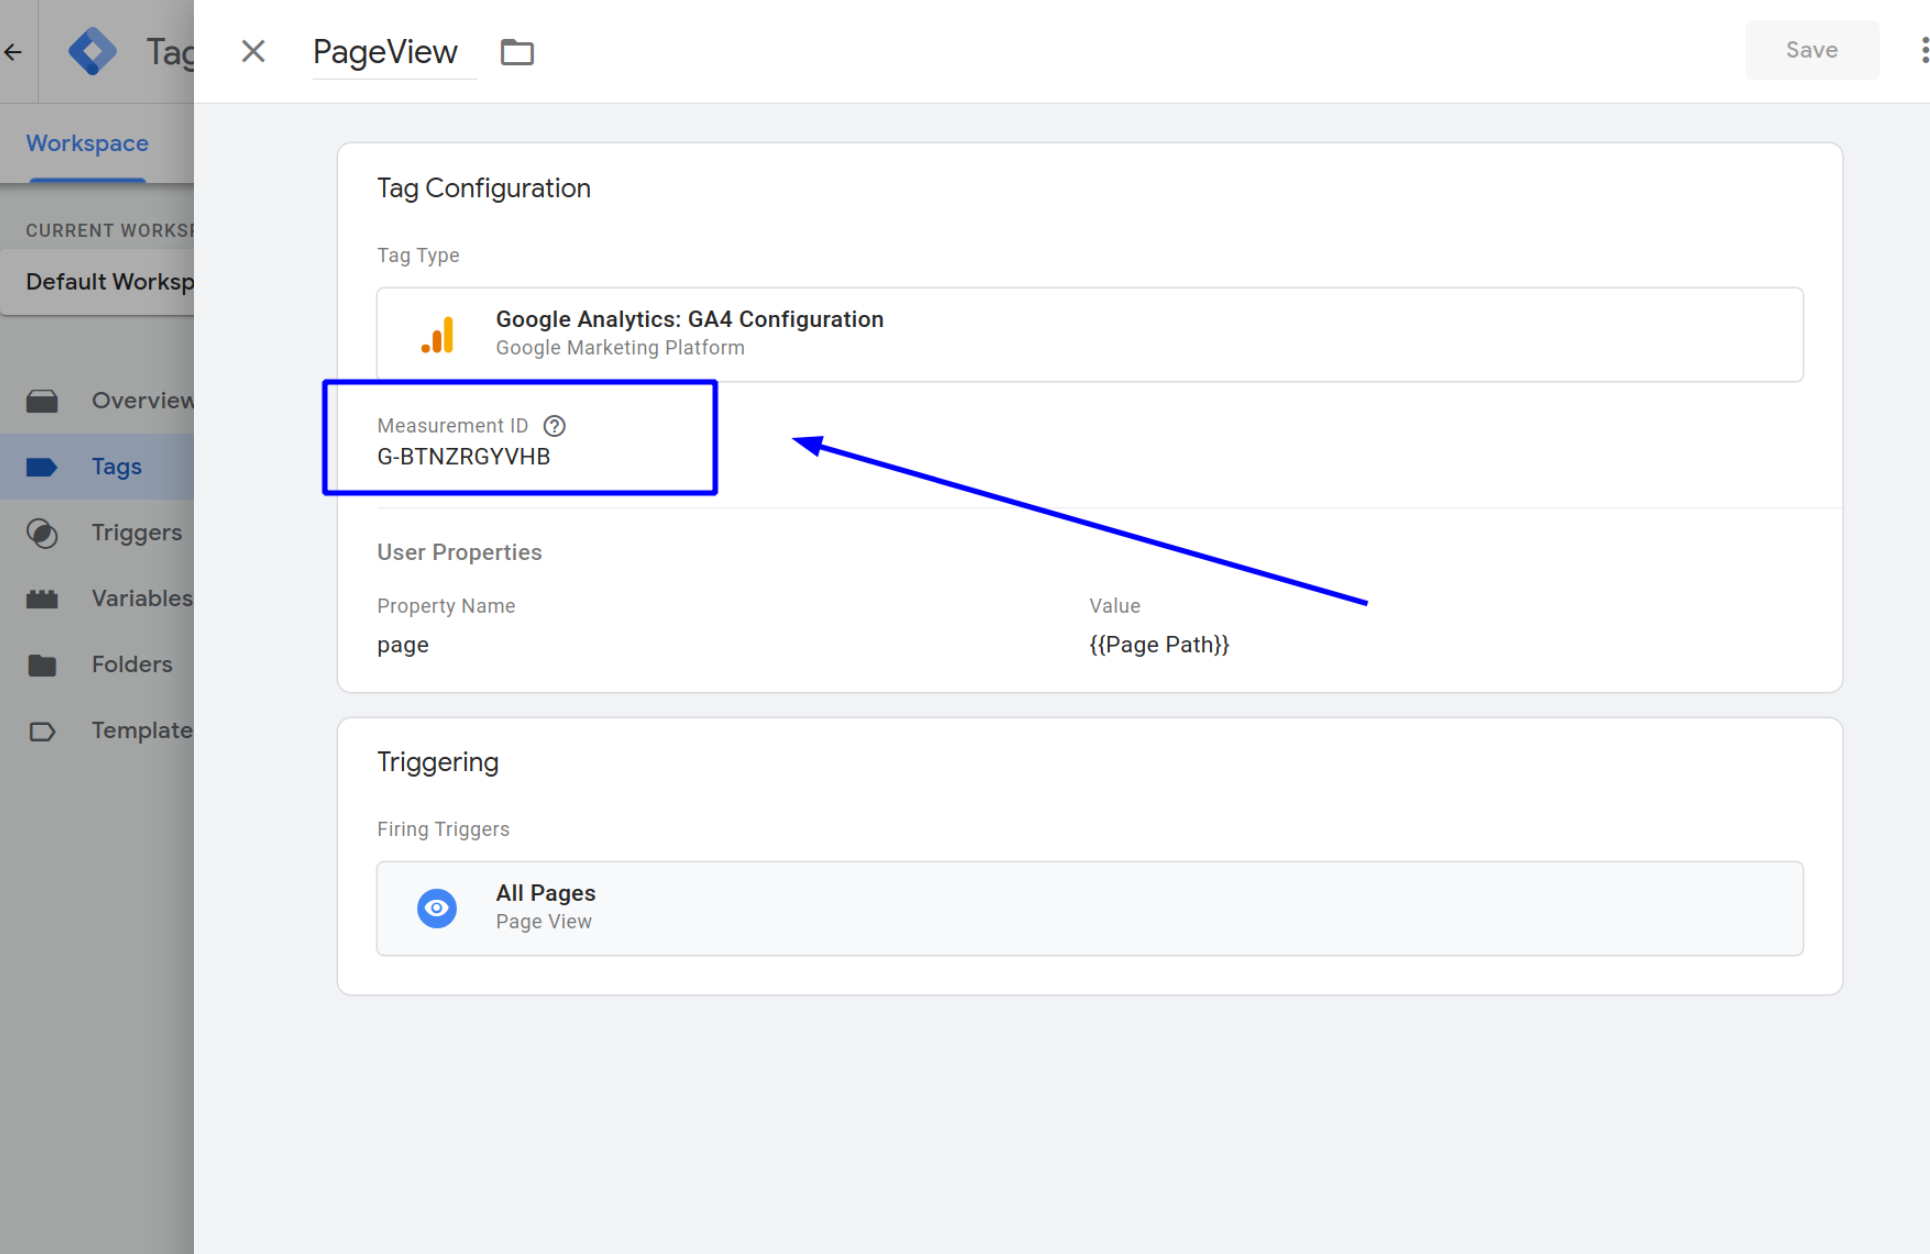
Click Save
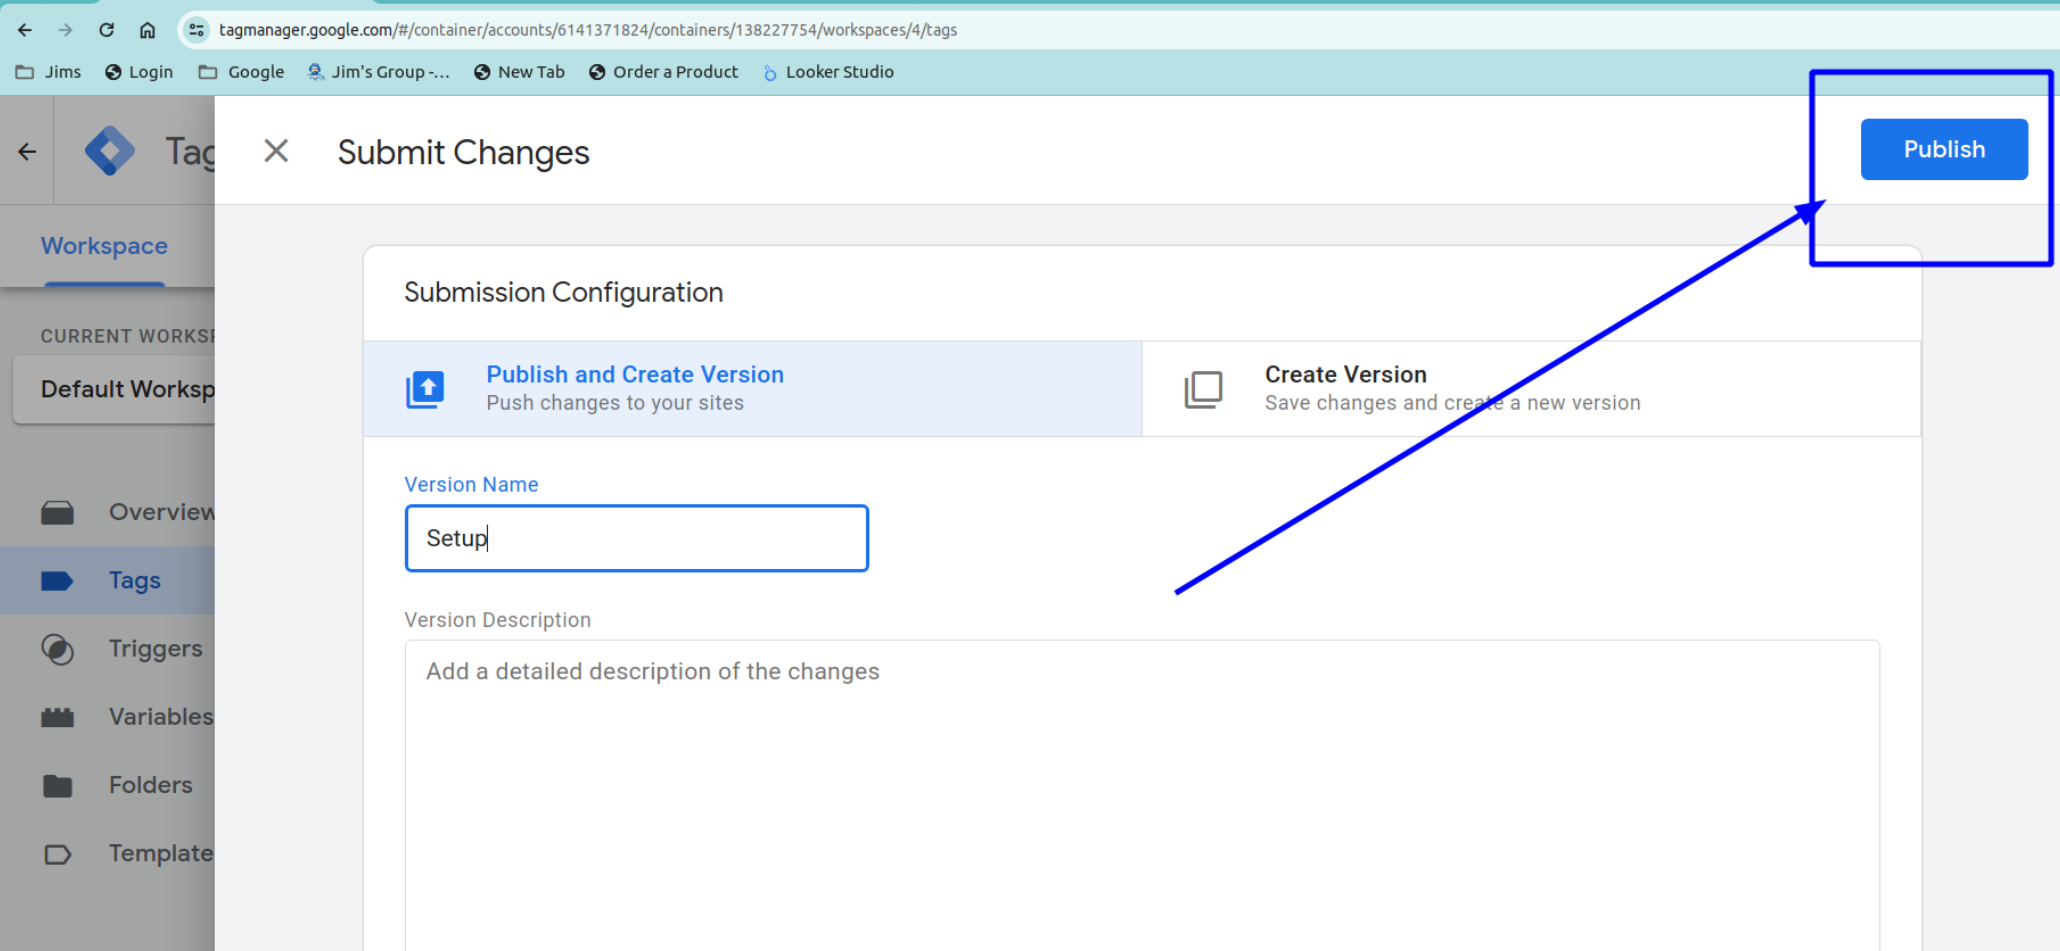
After this, click Submit, provide a description for you changes, for example “Setup”
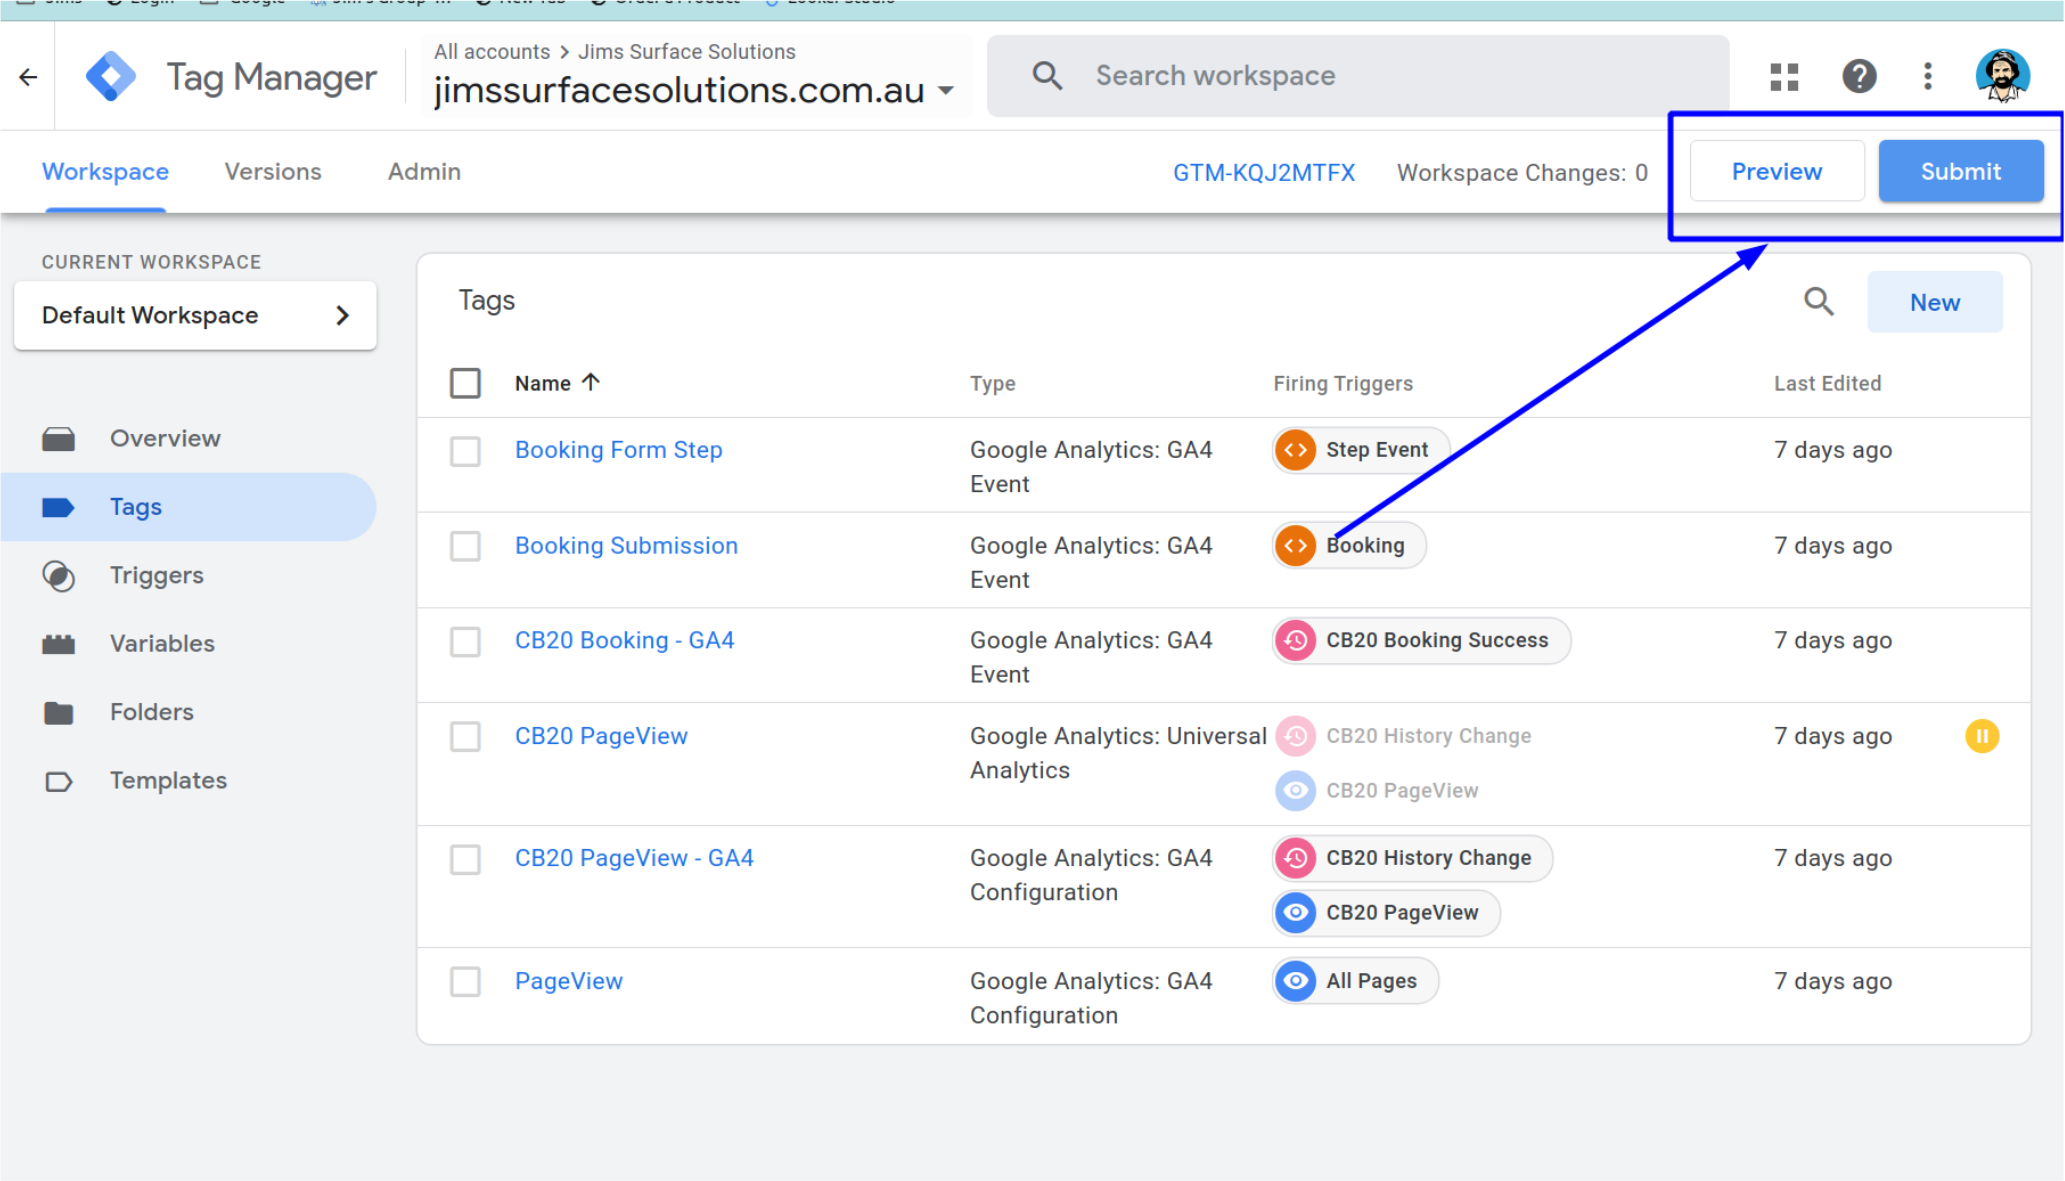
And Click Publish
Implementing Pixel Tracking (Optional)
Note: WPCB does not natively support pixel events at this time. Therefore, tracking must be set up using Google Tag Manager.
Please follow these steps:
- Remove any existing pixel tags or pixel-related plugins from your site, as they might interfere with the Pixel configuration set up through Google Tag Manager.
- Log in to your Google Tag Manager account.
- Unzip and import the additional pixel configuration provided in the link above.
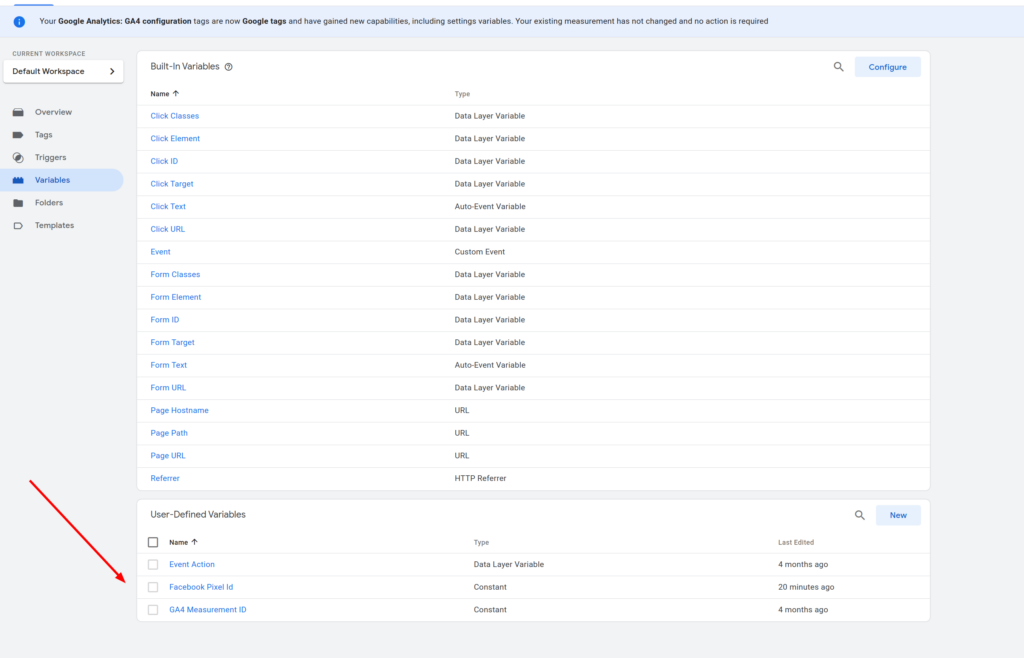
The configuration will import one(1) variable and two(2) tags.
Please locate the variable and replace the existing Facebook Pixel ID with your own.

Publish the container
Congratulations! You have successfully completed the configuration of your Tag Manager. We hope you found the process straightforward.
You’re All Set!
Congratulations! You’ve successfully completed the installation, setup, and utilization of the Jim’s WPCB plugin for your division’s website. With the power of this plugin, you’re equipped to streamline the booking process and enhance customer satisfaction.
Remember, we’re here to support you every step of the way. If you encounter any questions, challenges, or need further assistance, don’t hesitate to reach out Jim’s Infotech. We’re committed to ensuring that your booking system operates smoothly and seamlessly.